
After installing CC-Switch, the next step is adding your own API provider. A lot of beginners get stuck here: they aren't sure what to fill in, where to put it, or how to make it take effect. In this guide, we'll use APIYI (apiyi.com) as an example to walk you through the entire process—adding, switching, speed testing, and restoring official login.
Core Value: By the end of this article, you'll have mastered CC-Switch provider management and finished your entire configuration in just 3 minutes.
Preparation Before Adding a Provider to CC-Switch
Before we start, you'll need to have a few things ready:
Prerequisites Checklist
| Item | Description | How to Get It |
|---|---|---|
| CC-Switch | Installed and running properly | Download from GitHub Releases |
| API Key | Secret key from your provider | Register at apiyi.com |
| Base URL | API endpoint address | From provider documentation |
| CLI Tools | Claude Code/Codex/Gemini | Any one of these installed |
Registering an APIYI Account
If you don't have an APIYI account yet, get that sorted first:
- Visit the APIYI official site at apiyi.com
- Click register and create your account
- Go to the console to get your API Key
- Take note of the following info:
- API Key: A string starting with
sk- - Base URL:
https://api.apiyi.com
- API Key: A string starting with
🚀 New User Bonus: APIYI (apiyi.com) gives you free test credits right after registration. It supports Claude, GPT, Gemini, and other major models, so you can test things out before deciding to top up.
Checking for Environment Variable Conflicts
Important: If you've previously set an API Key in your system environment variables, it might override CC-Switch's configuration.
Check and clear any conflicting environment variables:
macOS/Linux:
# Check for conflicting variables
echo $ANTHROPIC_API_KEY
echo $ANTHROPIC_AUTH_TOKEN
echo $OPENAI_API_KEY

# If they have values, you'll need to remove them from ~/.zshrc or ~/.bashrc
Windows:
- Open "System Properties → Advanced → Environment Variables"
- Look for and delete variables like
ANTHROPIC_API_KEYorOPENAI_API_KEYif they exist.
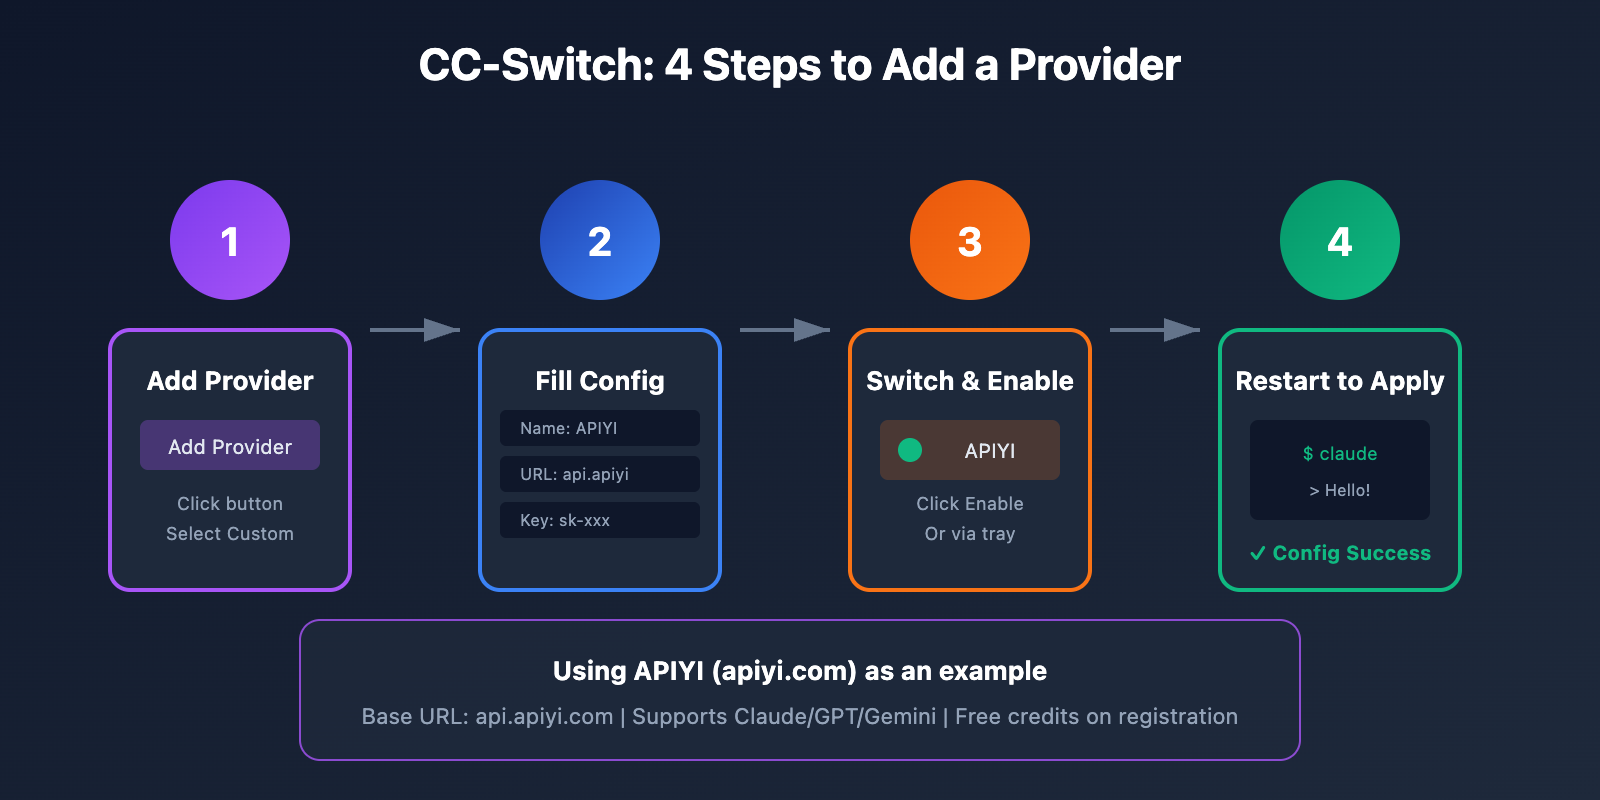
Steps to Add a Provider in CC-Switch
Step 1: Open the Add Provider Interface
- Launch the CC-Switch app.
- Find the 「Add Provider」 button on the main interface (usually located above the provider list).
- Click the button to open the provider configuration window.
Step 2: Choose a Configuration Method
CC-Switch offers two ways to add a provider:
| Method | Use Case | Action |
|---|---|---|
| Preset Configuration | Use built-in provider templates | Select preset → Enter API Key |
| Custom Configuration | Add third-party providers like APIYI | Select Custom → Fill in all details |
Since APIYI is a third-party provider, we'll select the 「Custom」 configuration.
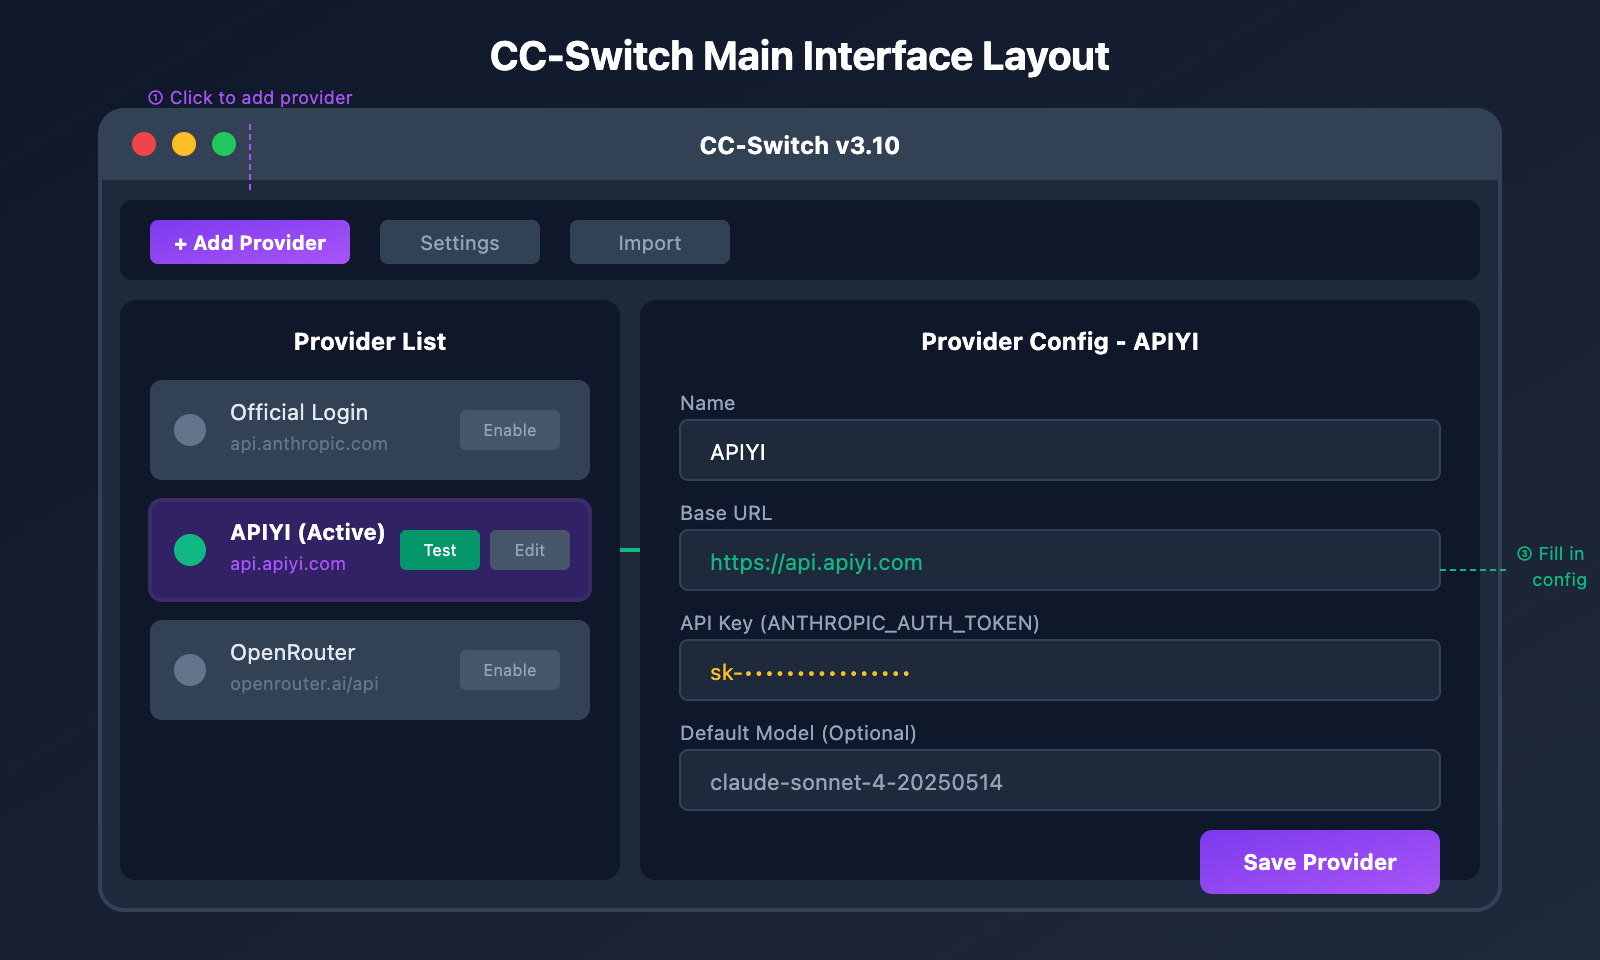
Step 3: Fill in Provider Configuration
This is the most critical step; you'll need to accurately fill in the following fields:
Basic Information
| Field | Value | Description |
|---|---|---|
| Name | APIYI |
Display name for the provider (customizable) |
| Base URL | https://api.apiyi.com |
API endpoint address |
| API Key | sk-your-apiyi-key |
The key obtained from apiyi.com |
Claude Code Configuration (If Applicable)
CC-Switch supports the following fields for Claude Code:
| Field | Recommended Value | Description |
|---|---|---|
| ANTHROPIC_AUTH_TOKEN | Your API Key | Primary authentication field |
| ANTHROPIC_API_KEY | Your API Key | Backup authentication field |
| ANTHROPIC_BASE_URL | https://api.apiyi.com |
API address |
Model Mapping Configuration (Optional)
If you need to specify default models, you can configure:
| Field | Recommended Value | Description |
|---|---|---|
| ANTHROPIC_MODEL | claude-sonnet-4-20250514 |
Default model |
| ANTHROPIC_DEFAULT_SONNET_MODEL | claude-sonnet-4-20250514 |
Sonnet model |
| ANTHROPIC_DEFAULT_OPUS_MODEL | claude-opus-4-20250514 |
Opus model |
Full Configuration Example
Here is a complete configuration for adding APIYI as a provider:
# Basic Info
Name: APIYI
Base URL: https://api.apiyi.com

# Claude Code Config
ANTHROPIC_AUTH_TOKEN: sk-your-apiyi-key
ANTHROPIC_BASE_URL: https://api.apiyi.com

# Model Config (Optional)
ANTHROPIC_MODEL: claude-sonnet-4-20250514
View full configuration in JSON format
{
  "name": "APIYI",
  "baseUrl": "https://api.apiyi.com",
  "claude": {
    "ANTHROPIC_AUTH_TOKEN": "sk-your-apiyi-key",
    "ANTHROPIC_API_KEY": "sk-your-apiyi-key",
    "ANTHROPIC_BASE_URL": "https://api.apiyi.com",
    "ANTHROPIC_MODEL": "claude-sonnet-4-20250514",
    "ANTHROPIC_DEFAULT_SONNET_MODEL": "claude-sonnet-4-20250514",
    "ANTHROPIC_DEFAULT_OPUS_MODEL": "claude-opus-4-20250514"
  },
  "codex": {
    "OPENAI_API_KEY": "sk-your-apiyi-key",
    "OPENAI_BASE_URL": "https://api.apiyi.com/v1"
  },
  "gemini": {
    "GEMINI_API_KEY": "sk-your-apiyi-key",
    "GOOGLE_GEMINI_BASE_URL": "https://api.apiyi.com/v1"
  }
}
Step 4: Save Configuration
- Double-check that all required fields are filled out.
- Click the 「Save」 or 「Confirm」 button.
- CC-Switch will validate the configuration format.
- Once saved successfully, the new provider will appear in your list.
💡 Configuration Tip: The interface provided by APIYI (apiyi.com) is fully compatible with OpenAI and Anthropic formats. You can simply use
https://api.apiyi.comas the Base URL without adding a/v1suffix (CC-Switch will handle it automatically).
3 Ways to Switch Providers in CC-Switch
Once you've added a provider, you'll need to switch to the new one for it to take effect. CC-Switch offers three ways to do this:
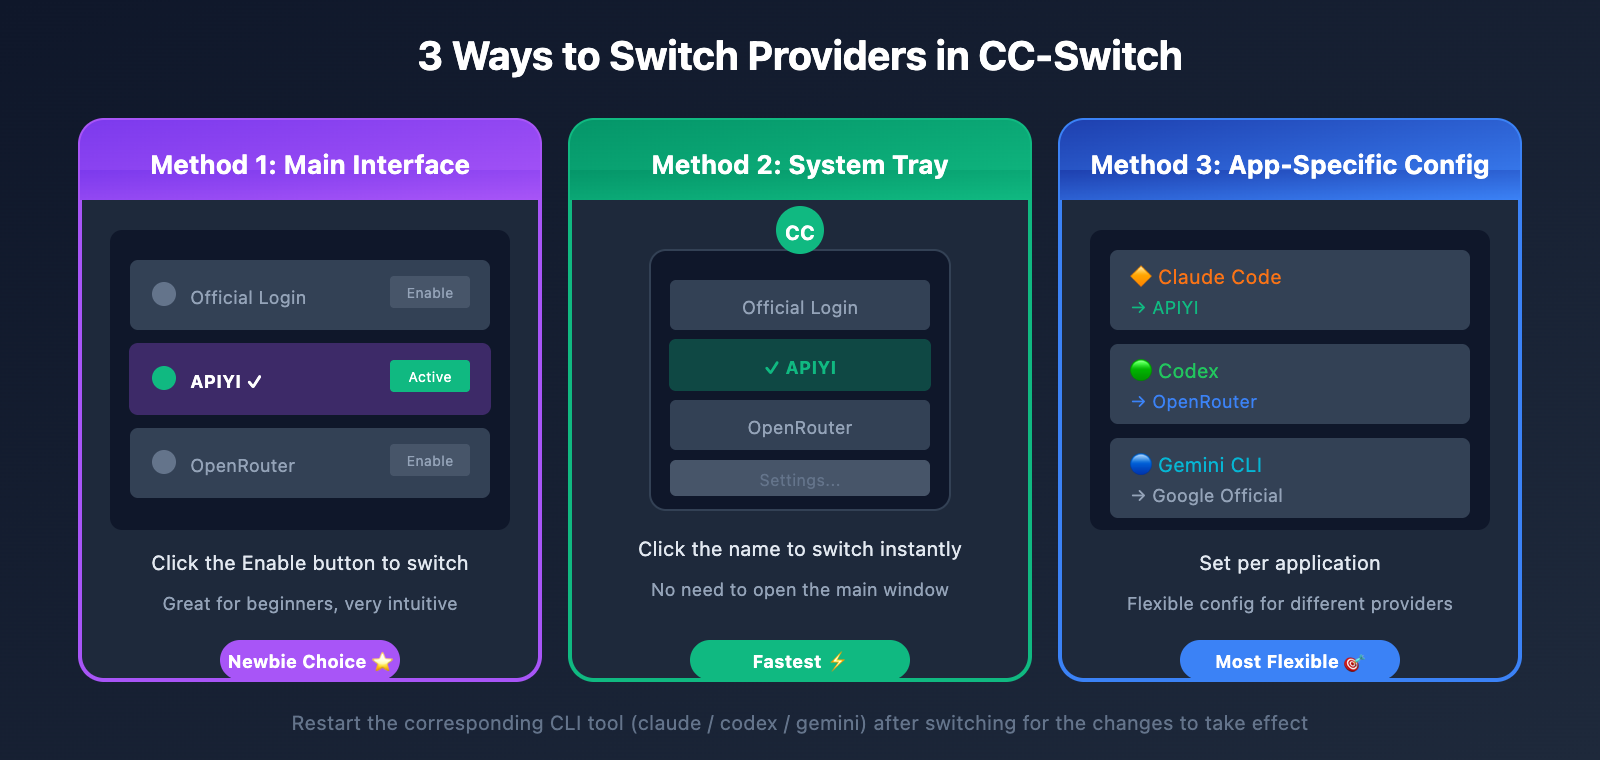
Method 1: Main Interface Switch (Recommended for Beginners)
This is the most straightforward way:
- Go to the provider list in the CC-Switch main window.
- Find the "APIYI" provider you just added.
- Click the "Enable" button next to it.
- Once the status changes to Active, the switch is complete.
┌─────────────────────────────────────────────────┐
│              CC-Switch Provider List             │
├─────────────────────────────────────────────────┤
│  ○ Official Login          [Enable]             │
│  ● APIYI (Active)          [Disable] [Test]    │  ← Currently Active
│  ○ OpenRouter              [Enable]             │
└─────────────────────────────────────────────────┘
Method 2: System Tray Switch (Recommended for Power Users)
An even faster way that doesn't require opening the main window:
- Locate the CC-Switch icon in your system tray (bottom-right on Windows / menu bar on macOS).
- Click the icon to expand the menu.
- Simply click the name of the "APIYI" provider.
- It takes effect instantly—no extra confirmation needed.
Pro Tip: This is the quickest way to jump between providers if you're testing different services frequently.
Method 3: App-Specific Configuration
If you're using multiple CLI tools simultaneously, you can assign a unique provider to each one:
| App | Provider | Description |
|---|---|---|
| Claude Code | APIYI | Main coding tool |
| Codex | OpenRouter | Backup option |
| Gemini CLI | Google Official | Using official services |
In CC-Switch, you can configure the provider for each application independently, giving you maximum flexibility.
How to Apply Changes in CC-Switch
Important: After switching providers, the configuration won't take effect in the CLI tool immediately. You'll need to restart the corresponding application.
Steps to Apply Changes
| CLI Tool | Restart Method |
|---|---|
| Claude Code | Close the current terminal, reopen it, and run claude. |
| Codex | Exit the Codex process and run codex again. |
| Gemini CLI | Close the terminal and run gemini again. |
| OpenCode | Exit and run opencode again. |
Verifying Your Setup
Once you've restarted, you can verify that the configuration is active using these methods:
Method 1: Direct Chat Test
claude
# Type a simple question. If it replies normally, you're good to go.
> Hello, please reply in Chinese.
Method 2: Use the CC-Switch Speed Test
- Click the "Test" button next to the provider.
- Check the latency and status.
- A green ✓ indicates the connection is working perfectly.
Method 3: Check Configuration Files
# Claude Code config file
cat ~/.claude/settings.json

# You should see something like this:
# "apiBaseUrl": "https://api.apiyi.com"
🎯 Validation Tip: You can check your API call history via the APIYI (apiyi.com) console. If you see new request records there, it means your configuration is active.
Restoring Official Login via CC-Switch
If you need to switch back to the official services, CC-Switch provides a one-click restore feature.
Restoring Official Login for Claude Code
- Find the "Official Login" preset in the CC-Switch provider list.
- Click "Enable" to switch to official mode.
- Restart your terminal and run
claude. - Follow the official Claude Code login flow (OAuth authentication).
Restoring Official Login for Codex
- Select the "Official Login" preset (Codex version).
- Click to enable it.
- Restart and run
codex. - Follow the prompts to complete the official OpenAI authentication.
Restoring Official Login for Gemini CLI
- Select the "Google Official" preset.
- Click to enable it.
- Restart and run
gemini. - Follow the prompts to complete the Google OAuth process.
Recovery Process Summary
| CLI Tool | Select Preset | Next Steps |
|---|---|---|
| Claude Code | Official Login | Restart → OAuth Login |
| Codex | Official Login | Restart → API Key Login |
| Gemini CLI | Google Official | Restart → Google OAuth |
| OpenCode | Official Login | Restart → Configure Official Key |
Note: When you restore the official login, CC-Switch automatically backs up your custom settings. When you switch back to a third-party provider next time, your previous configuration will still be there.
CC-Switch: Advanced Provider Management Tips
Tip 1: Provider Speed Comparison
After adding multiple providers, you can run a batch speed test to pick the fastest one:
- Click the "Test" button for each provider one by one.
- Record the latency values for each.
- Choose the provider with the lowest latency as your primary option.
Reference Standards:
| Latency Range | Evaluation | Suggestion |
|---|---|---|
| < 200ms | Excellent | Preferred choice |
| 200-500ms | Good | Very usable |
| > 500ms | Slow | Keep as a backup |
Tip 2: Duplicating Providers
If you need to create a provider with a similar configuration:
- Select an existing provider.
- Click "Duplicate" or right-click and select "Copy".
- Modify the name and specific settings.
- Save it as a new provider.
Tip 3: Config Backup and Sync
CC-Switch supports cloud synchronization for your configurations:
- Go to Settings → Storage.
- Select a cloud sync folder (like Dropbox or OneDrive).
- All your provider configurations will sync automatically.
This makes it easy to share the same provider setup across multiple devices.
Tip 4: Sharing Provider Configs
Version 3.9.0+ supports the "Shared Provider" feature:
- A single provider configuration can be applied to Claude, Codex, and Gemini simultaneously.
- This is perfect for gateways like APIYI that support multiple protocols.
- Just check "Sync to all apps" when adding a provider.
CC-Switch: Adding Providers FAQ
Q1: I added a provider, but Claude Code is still using the official API?
Here are the likely causes and how to fix them:
- Provider not switched: Check if that provider's status in CC-Switch is set to "Active".
- App not restarted: Close your terminal and reopen it before running
claudeagain. - Environment variable override: Check if your system has an
ANTHROPIC_API_KEYenvironment variable set; if so, you'll need to delete it. - Config conflict: Try deleting
~/.claude/settings.jsonand then switching again.
You can check the APIYI (apiyi.com) console to see if there are any call logs, which will help you determine if your configuration is actually working.
Q2: What should I enter for the Base URL?
Here are the Base URL formats for different providers:
| Provider | Base URL |
|---|---|
| APIYI | https://api.apiyi.com |
| OpenRouter | https://openrouter.ai/api |
| Official Claude | https://api.anthropic.com |
| Official OpenAI | https://api.openai.com |
The interface address for APIYI (apiyi.com) is simple and easy to remember—just enter https://api.apiyi.com.
Q3: Which field does the API Key go in?
It depends on the CLI tool you're using:
| CLI Tool | API Key Field |
|---|---|
| Claude Code | ANTHROPIC_AUTH_TOKEN or ANTHROPIC_API_KEY |
| Codex | OPENAI_API_KEY |
| Gemini CLI | GEMINI_API_KEY |
| OpenCode | Configure in Provider options |
Keys provided by APIYI always start with sk- and are compatible with all the fields mentioned above.
Q4: How do I configure multiple providers at once?
CC-Switch allows you to add an unlimited number of providers:
- Repeat the "Add Provider" process to create multiple configurations.
- Toggle between them in the list using the Enable button.
- You can set different default providers for different CLI tools.
Recommended Setup:
- Primary: APIYI (Great pricing, fast access).
- Backup: OpenRouter (Wide variety of models).
- Last Resort: Official Login (Ensures availability).
Q5: What should I do if I get a “Validation Failed” error after configuring?
Common reasons include:
- Incorrect API Key: Double-check that you've copied the full key, including the
sk-prefix. - Wrong Base URL format: Make sure you haven't added a trailing slash or any extra paths.
- Network issues: Check if you can access the provider's website directly.
- Insufficient balance: Log in to the apiyi.com console to check your account balance.
APIYI Provider Configuration Cheat Sheet
To help you get set up quickly, here are the full configuration parameters for APIYI:
| Setting | Value |
|---|---|
| Provider Name | APIYI (Customizable) |
| Base URL | https://api.apiyi.com |
| API Key Format | sk-xxxxxxxx |
| Supported CLIs | Claude Code, Codex, OpenCode, Gemini CLI |
| Supported Models | Claude 4, GPT-4o, Gemini 2.5, DeepSeek, etc. |
| Billing Method | Pay-as-you-go, no monthly fees |
| Get it here | apiyi.com |
Summary
With this tutorial, you've learned the full workflow for managing providers in CC-Switch:
- Add Provider: Click Add Provider → Select Custom → Fill in the configuration → Save.
- Switch Providers: Click Enable on the main interface or click the provider name directly from the system tray.
- How to Apply: Restart your terminal or the corresponding CLI client.
- Revert to Official: Select the Official Login preset → Restart → Complete the OAuth flow.
The combo of CC-Switch + APIYI makes API management a breeze:
- CC-Switch: Visual management with one-click switching.
- APIYI (apiyi.com): A unified interface, affordable pricing, and support for multiple models.
Head over to APIYI (apiyi.com) right now to get your API Key, add it as a provider in CC-Switch, and start enjoying a more efficient AI coding experience!
📝 Author: APIYI Tech Team | APIYI (apiyi.com) – Making AI API calls simpler