
Author's Note: This article provides a systematic explanation of the real principles behind gpt-image-2 image layering, the phenomena observed in Python backend processing, API invocation methods, and cost optimization strategies. It aims to help developers avoid the common mistake of confusing toolchain capabilities with native model capabilities.
If you've been using gpt-image-2 recently for posters, scientific diagrams, product images, or slide decks, you might have noticed an interesting phenomenon: some claim it can "layer images" or even break an image down into editable objects via Python in the background.
At first glance, it looks like the model suddenly learned Photoshop, but in reality, it's more of a multi-toolchain workflow: gpt-image-2 handles the generation or editing of high-quality images, while Python scripts handle post-processing tasks like OCR, background inpainting, element segmentation, and reconstruction into SVG/PPTX/PSD formats.
This isn't just another introductory guide. Instead, it’s a complete breakdown of what gpt-image-2 image layering can and cannot do, covering API capabilities, layering principles, Python post-processing, cost calculations, and engineering implementation.
Core Value: After reading this, you'll clearly understand the boundaries of gpt-image-2 image layering, know how to integrate gpt-image-2 official proxy APIs via APIYI (apiyi.com), and learn how to design a production-ready "image generation to editable asset" pipeline.
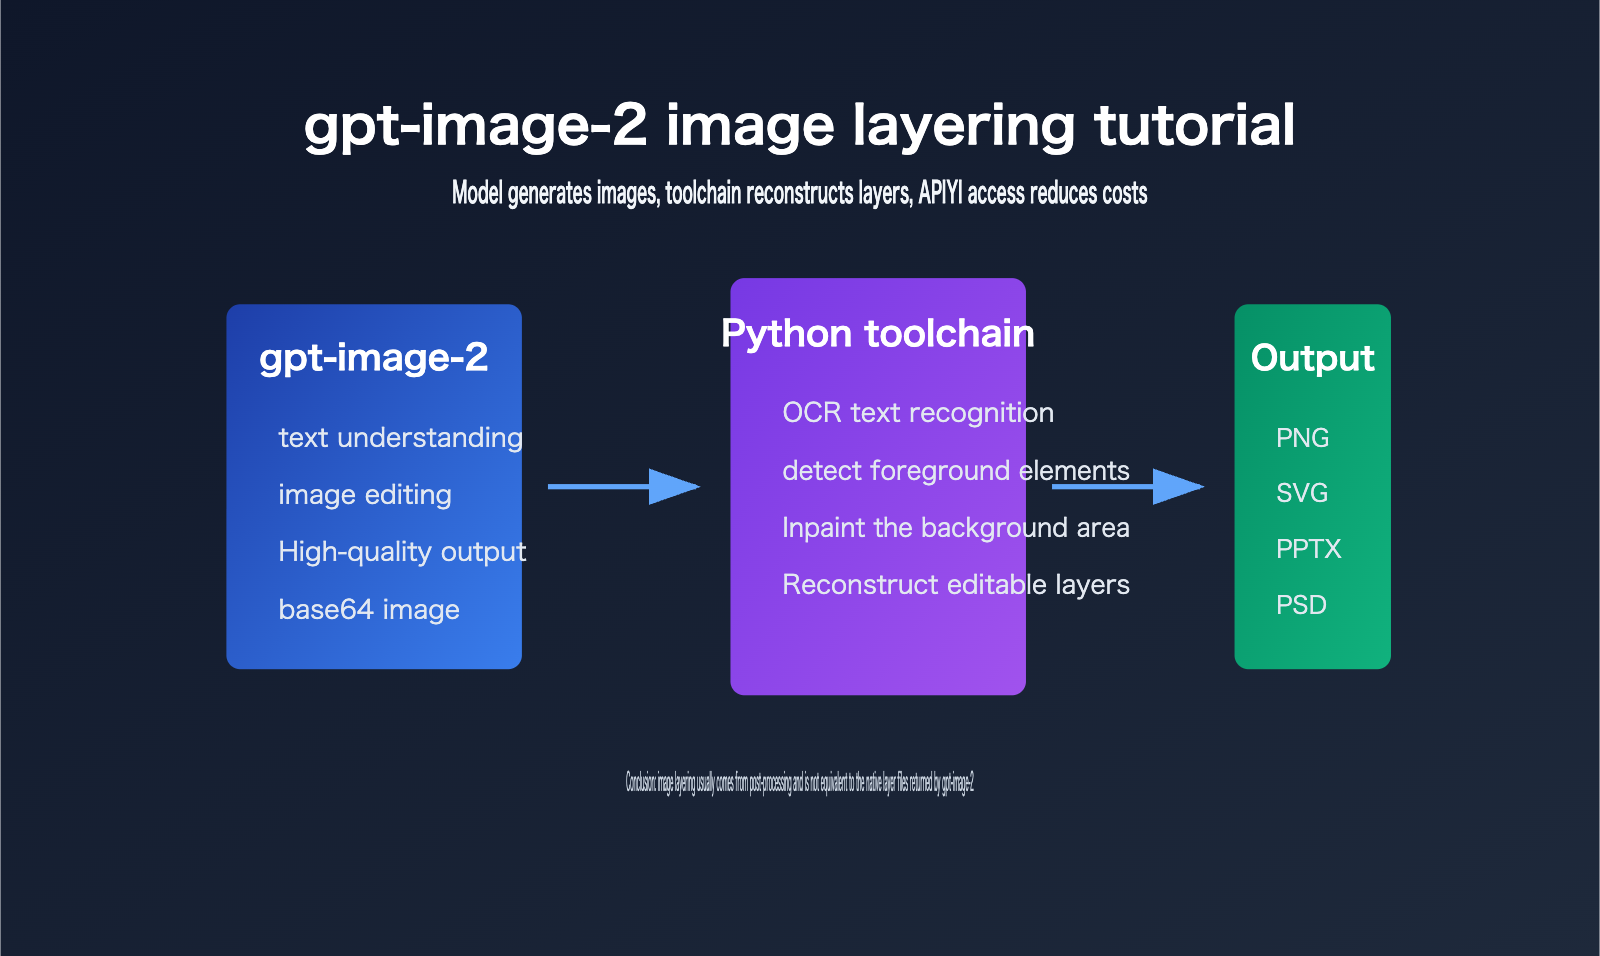
Key Points of gpt-image-2 Image Layering
The key to gpt-image-2 image layering is distinguishing between "model output" and "product workflow output."
The official OpenAI model page defines gpt-image-2 as an image model for fast, high-quality image generation and editing, supporting text input, image input, and image output, and compatible with the Images API generation and editing endpoints.
However, looking at the current public API, the core result developers receive is still image data, not a Photoshop-style multi-layer project file.
| Point | Description | Value to Developers |
|---|---|---|
| Native Model Capability | gpt-image-2 handles prompts, reference images, and editing intent to output the final image | Suitable for generating posters, product images, illustrations, and visual drafts |
| API Output Format | Official documentation focuses on fields like b64_json, image format, dimensions, quality, and token usage |
Convenient for server-side storage, uploading, auditing, and billing |
| Source of Image Layering | Most editable layers come from post-processing like OCR, segmentation, inpainting, vectorization, and PPTX/PSD writing | Explains "why Python runs in the background" |
| Cost Optimization | Official proxy APIs can be integrated at official rates, combined with recharge bonuses to lower actual costs | Suitable for batch generation, testing, and production integration |
gpt-image-2 Image Layering is Not Native PSD Output
The most common misconception about gpt-image-2 image layering is assuming that the "editable file seen by the end user" is the file directly output by the model.
From an engineering perspective, these are completely different.
The model outputs an image, which is typically received by the application as base64 image data or an image file.
If a product can turn this into a PPTX, SVG, or PSD file, it usually means the product has added a post-processing layer after the model.
This layer is often implemented in Python because of its mature ecosystem for image processing, OCR, deep learning inference, and office document generation.
For example, an engineer might use OCR to identify text, use inpainting to clean up the text area in the original image, and then use python-pptx to reconstruct text boxes and image layers.
This workflow makes users feel like the "image has been layered," but in essence, it's reverse-engineering an editable structure from a flat image.
This reverse-engineering isn't always perfect.
The clearer the text, the simpler the background, and the more regular the layout, the better the layering effect.
If the image contains complex textures, semi-transparent shadows, handwritten text, fine decorations, or highly overlapping objects, post-processing is prone to misdetection, missed detection, and edge artifacts.
gpt-image-2 Image Layering Requires Focus on Model and Toolchain Boundaries
When developers implement gpt-image-2 image layering, they should split the system into two parts.
The first part is the generation phase: let gpt-image-2 output images with high visual quality, clear structure, and accurate text.
The second part is the structuring phase: use Python or other post-processing tools to convert the flat image into editable objects.
The goals for these two parts are different, and so are the evaluation metrics.
The generation phase focuses on prompt adherence, composition, text accuracy, visual consistency, and output cost.
The structuring phase focuses on text editability, object segmentation accuracy, naturalness of background inpainting, export file compatibility, and manual correction costs.
Technical Advice: If you want to verify the gpt-image-2 image layering pipeline, it is recommended to first integrate the gpt-image-2 official proxy API via APIYI (apiyi.com) to get generation and editing working, then gradually add OCR, segmentation, inpainting, and export modules. This allows you to isolate model issues from post-processing issues.
How gpt-image-2 Image Layering Works
You can think of gpt-image-2 image layering as a form of reverse engineering—turning a "flat image" into "structured assets."
It’s not just simple background removal; it’s a comprehensive workflow that combines visual understanding, traditional image processing, and document generation.
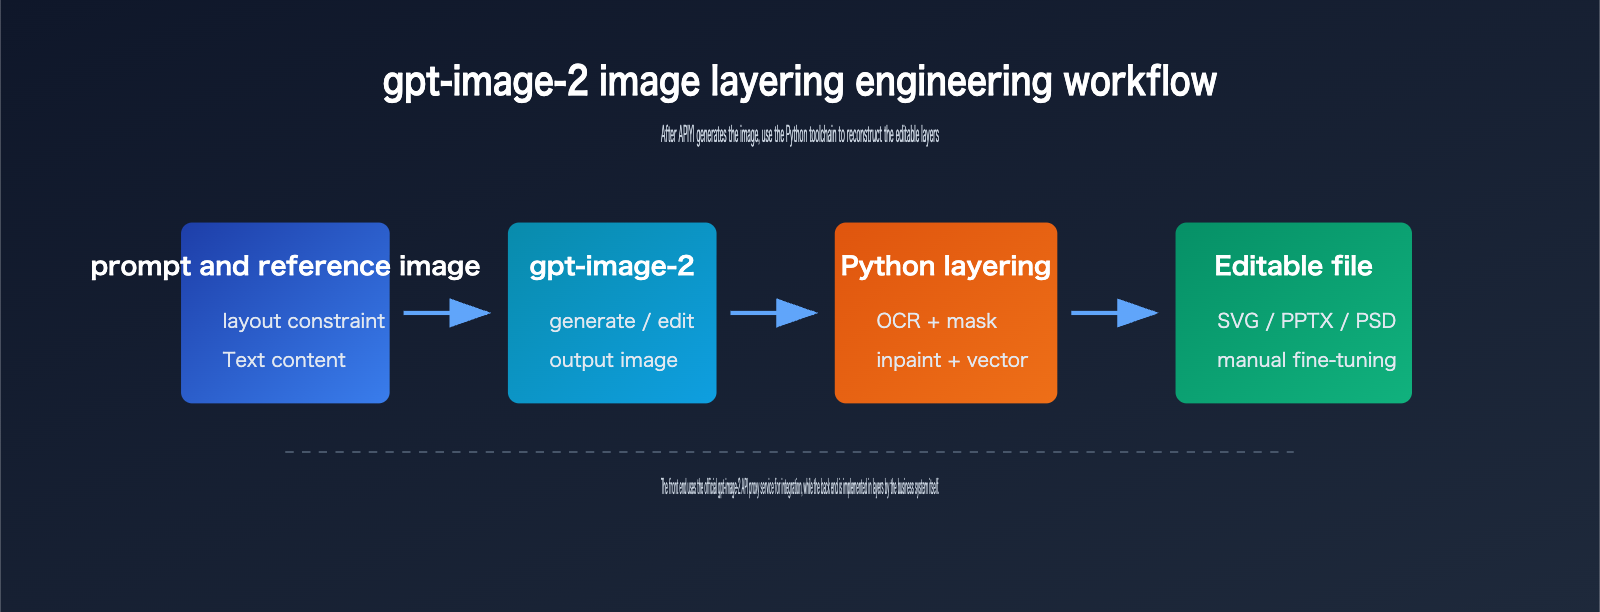
Step 1: Generating Images Optimized for Layering
To make gpt-image-2 image layering more stable, you need to optimize the generation phase for post-processing.
Your prompt should explicitly request a clear layout, well-defined element boundaries, independent text areas, and avoid overly complex background textures.
If your goal is to create PPTX or SVG files, I recommend using flat design, clear color blocks, and minimal shadows or gradients.
If you're aiming for PSD files, make sure to clearly describe the relationships between the subject, background, text, and decorative elements.
A common mistake is asking the model to generate a highly complex movie poster and then expecting post-processing tools to automatically extract perfect layers. That’s just not realistic with current engineering capabilities. The layering quality is highly dependent on how "parsable" the input image is.
Step 2: Detecting Text and Objects
The most common task for the Python backend is detection.
Text detection typically uses OCR models to identify character content, positions, font sizes, and text box boundaries.
Object detection or segmentation identifies visual objects like people, products, icons, lines, and background regions.
For slides or infographics, it might also identify titles, paragraphs, tables, arrows, axes, and legends.
It’s important to note that this layer isn't something gpt-image-2 "returns" itself; rather, the post-processing model infers these layers from the pixels.
The more accurate the inference, the more the exported PPTX, SVG, or PSD will resemble the original design. When inference is inaccurate, you’ll typically run into issues like offset text boxes, inconsistent fonts, visible background patches, or fragmented icons.
Step 3: Background Inpainting and File Reconstruction
Once OCR identifies the text areas, you usually need to erase the text from the original image to make it editable.
After erasing the text, you’ll be left with holes in the background.
This is where inpainting or image restoration algorithms come in to fill those gaps.
Then, the system writes the identified text back into the PPTX, SVG, or PSD as independent text boxes.
If you want more granular object layers, you’ll also need to generate masks for foreground elements, cut them out, and write them into separate layers.
While this process sounds like "the model does the layering," it’s more accurate to say it’s "model-generated image + Python image parsing + document library layer reconstruction."
Getting Started with gpt-image-2 Image Layering
Here is a minimal pipeline for developers to get started with gpt-image-2 image layering.
- Fetch the image via API.
- Save the image as a local file.
- Pass it to the OCR, segmentation, inpainting, and export modules.
Minimal API Example
This example shows how to call the gpt-image-2 API via a unified interface.
from openai import OpenAI
import base64

client = OpenAI(
    api_key="YOUR_APIYI_KEY",
    base_url="https://vip.apiyi.com/v1"
)

result = client.images.generate(
    model="gpt-image-2",
    prompt="Generate a product launch poster suitable for layering, solid background, clear text areas, well-defined element boundaries",
    size="1024x1024",
    quality="medium",
    output_format="png"
)

image_bytes = base64.b64decode(result.data[0].b64_json)
open("poster.png", "wb").write(image_bytes)
The point of this code isn't to "get a PSD immediately," but to first obtain a clear image suitable for post-processing. If you see the server continuing to run Python scripts, it’s likely entering the OCR, mask, inpainting, or export stages.
Full Processing Framework
Here is a processing framework that’s closer to a real-world project. It doesn't bind to a specific OCR or segmentation model, but shows the module boundaries.
from pathlib import Path

def generate_image(prompt: str) -> Path:
    """Call the gpt-image-2 API and save the flat image."""
    # client = OpenAI(api_key="YOUR_APIYI_KEY", base_url="https://vip.apiyi.com/v1")
    # response = client.images.generate(model="gpt-image-2", prompt=prompt)
    return Path("poster.png")

def detect_layout(image_path: Path) -> dict:
    """OCR, object detection, and layout recognition."""
    return {"texts": [], "objects": [], "background_regions": []}

def rebuild_editable_file(image_path: Path, layout: dict) -> Path:
    """Inpaint background and export to SVG, PPTX, or PSD."""
    return Path("poster-editable.pptx")

prompt = "Generate an AI product poster with clear text, separated elements, suitable for layered editing"
image_path = generate_image(prompt)
layout = detect_layout(image_path)
editable_path = rebuild_editable_file(image_path, layout)
print(editable_path)
In production, I recommend splitting generate_image and rebuild_editable_file into asynchronous tasks. Image generation takes time, and post-processing can be CPU or GPU intensive. For teams generating posters, product images, or research charts in bulk, it's best to queue these tasks and log the duration and failure reasons for each step.
Quick Start Tip: The APIYI (apiyi.com) gpt-image-2 API is perfect for getting the generation phase up and running, allowing you to integrate your own Python layering modules afterward. This lets you leverage the official model's capabilities while keeping the logic for editable files within your own system.
Prompt Templates for gpt-image-2 Image Layering
If your end goal is "layerability," your prompts should be more restrained than standard text-to-image prompts.
| Goal | Recommended Prompt Style | Avoid |
|---|---|---|
| Poster Layering | Solid or low-complexity gradient background, independent title text, clear product edges | Complex movie-style posters with heavy textures and smoke |
| PPT Layering | Flat infographic style, clear titles, icons, arrows, and three-part descriptions | Highly artistic or abstract visuals |
| Product Layering | Product in the center, clean background, soft shadows, clear boundaries | Strong fusion between product and background |
| SVG Reconstruction | Geometric shapes, lines, color blocks, minimal text, avoid realistic photo textures | Heavy fine textures, complex characters, and transparent materials |
Good prompts significantly reduce the difficulty of post-processing. From an engineering perspective, "suitable for generation" and "suitable for layering" are not the same goal. Regular users want visual impact, while a layering system needs structural clarity. If you're building an automated asset production pipeline, always prioritize structural clarity.
Analysis of Python Backend Phenomena in gpt-image-2 Image Layering
When users see Python processing gpt-image-2 image layering in the background, there are generally three possibilities.
The first is an API wrapper script.
To reduce redundant code, developers often write Python scripts to call gpt-image-2, automatically save images, log parameters, handle errors, and manage retries.
These scripts do not mean the model itself is running on Python.
The second is an image post-processing script.
For example, passing the output image to OCR, segmentation models, background inpainting models, vectorization tools, or PPTX/PSD generation libraries.
These scripts are the primary source of that "layered feel."
The third is an Agent workflow script.
If a user calls image generation via ChatGPT, Codex, Claude Code, or other Agent tools, the Agent might automatically select a Python tool to complete tasks like downloading, converting, cropping, stitching, or file generation.
This is still tool invocation at the product layer, not gpt-image-2 API natively returning multiple layers.
Why Python is Commonly Used for gpt-image-2 Image Layering
Python is well-suited for gpt-image-2 image layering, not because it's mysterious, but because of its complete ecosystem.
| Processing Stage | Common Python Tasks | Typical Value |
|---|---|---|
| API Invocation | Call Images API, save base64 images, log request parameters | Stable image generation |
| OCR | Identify text content, positions, and text boxes | Convert image text into editable text |
| Segmentation | Generate masks for subjects, backgrounds, icons, and lines | Split visual objects |
| Inpainting | Fill in the background after erasing text or objects | Create a clean base image |
| Export | Write to SVG, PPTX, PSD, or other formats | Deliver editable files |
The benefit of this chain is flexibility.
Developers can choose different OCR models, segmentation models, and export formats based on their business scenarios.
The downside is that result stability isn't entirely determined by gpt-image-2.
If the OCR misreads characters or background inpainting fails, the final editable file will have issues, even if the original image quality is excellent.
gpt-image-2 Image Layering is Not the "Layers" in Security Policies
There is another term that is easily confused: "layers."
OpenAI's security documentation often mentions expressions like image input layers, image output layers, and multiple layers of protection.
Here, "layers" refers to security detection layers, input/output detection layers, or protective barriers, not Photoshop layers.
If you see "layers" in English documentation, translating it directly as "image layers" can easily lead to misunderstandings.
When making technical selections, I recommend always referring back to the API fields and output formats.
If the interface does not return a list of layers, a list of masks, an object tree, or a PSD file, it cannot be considered a native image layering interface.
Reliability Criteria for gpt-image-2 Image Layering
To judge whether a gpt-image-2 image layering solution is reliable, look at four indicators.
First, check if it clearly distinguishes between the original image output and post-processing output.
Second, check if it can display the source of each layer, such as the OCR text layer, background base layer, and foreground object layer.
Third, check if it allows for manual correction.
Fourth, check if it can reproduce the layering results for the same image.
If a system only claims "AI automatic layering" without explaining the logic behind OCR, masks, inpainting, and exporting, developers should evaluate it with caution.
Solution Suggestion: In actual projects, you can obtain stable generation capabilities for gpt-image-2 through official proxy channels and then build the Python layering capabilities as an internal service. This allows you to utilize official channel capabilities without binding post-processing black boxes to a single tool.
gpt-image-2 Image Layering API Costs and the 14% Off Perspective
The cost of gpt-image-2 image layering needs to be broken down.
Model generation is one part of the cost.
OCR, segmentation, inpainting, exporting, and storage are another part.
If you only look at "how much it costs to generate one editable file," it's easy to misjudge the budget.
gpt-image-2 Image Layering Official Price Reference
According to OpenAI's official API pricing page, the public price for gpt-image-2 includes image input, cached image input, image output, text input, and cached text input.
| Billing Item | Official Price Basis | Meaning in Image Layering |
|---|---|---|
| Image input | $8.00 / 1M tokens | Incurred when inputting reference images, edit images, or material images |
| Cached image input | $2.00 / 1M tokens | Cost for reusable cached image inputs |
| Image output | $30.00 / 1M tokens | Primary cost for the output image itself |
| Text input | $5.00 / 1M tokens | Prompts, editing instructions, layout specifications |
| Cached text input | $1.25 / 1M tokens | Cost optimization space for cacheable prompts |
Official pricing is the foundation for budgeting.
However, in real projects, you must also consider failure retries, batch queues, post-processing computing power, manual verification, and storage costs.
If you need to frequently generate multiple versions of posters, I suggest controlling costs through prompts, dimensions, quality, and retry strategies.
Cost Perspective of Using APIYI's Official Proxy API for gpt-image-2
APIYI (apiyi.com)'s gpt-image-2 official proxy API allows you to connect using the official price basis, which is suitable for teams that want to maintain official model channels while reducing integration complexity.
The recharge promotion mentioned by users is: recharge $100 and get a 10% bonus balance.
Calculating strictly as "$100 paid for $110 in usable balance," the equivalent unit cost is approximately 90.9% of the official price.
When converted based on platform promotional displays and comprehensive discount metrics, it can be understood as being in the range of approximately 14% off (86% of) the official website price, subject to actual recharge credits and platform settlement rules.
| Connection Method | Price Basis | Advantages | Notes |
|---|---|---|---|
| OpenAI Official API | Official Price | Native channel, complete documentation | Requires self-management of accounts, payments, quotas, and risk control |
| gpt-image-2 Proxy API | Official Price Basis | Fast integration, unified interface, easy team management | Requires recharge and settlement per platform rules |
| Recharge Promotion | Recharge $100 get 10% | Can lower actual unit costs | Discount metrics subject to actual credits |
| Self-built Reverse Proxy | Variable | High flexibility | Higher compliance, stability, and maintenance costs |
Cost Suggestion: If you are conducting product testing for gpt-image-2 image layering, I recommend using APIYI (apiyi.com)'s proxy API to run 50 to 100 samples first. Log the generation cost, layering success rate, and manual correction time for each image before deciding whether to scale up batch calls.
gpt-image-2 Image Layering Cost Optimization Checklist
Don't just focus on unit prices when optimizing costs.
It's more important to reduce ineffective generation.
First, use structured prompts to reduce retries caused by unclear composition.
Second, use medium quality for layout verification first, then increase quality for the final version.
Third, cache template prompts to reduce repeated text input costs.
Fourth, use unified reference images and layout specifications for the same product images to lower post-processing difficulty.
Fifth, categorize failed samples to distinguish between model generation failures and Python layering failures.
Sixth, prioritize flat infographic styles for scenarios requiring editable delivery.
These practices are often more effective than simply chasing a lower unit price.
gpt-image-2 Image Layering Strategy Comparison
Different teams have varying requirements for gpt-image-2 image layering.
Some users just want to change a title, others need to export to PPTX, some require a full PSD, and others simply want a clean, structured SVG.
The comparison below will help you choose the right path.
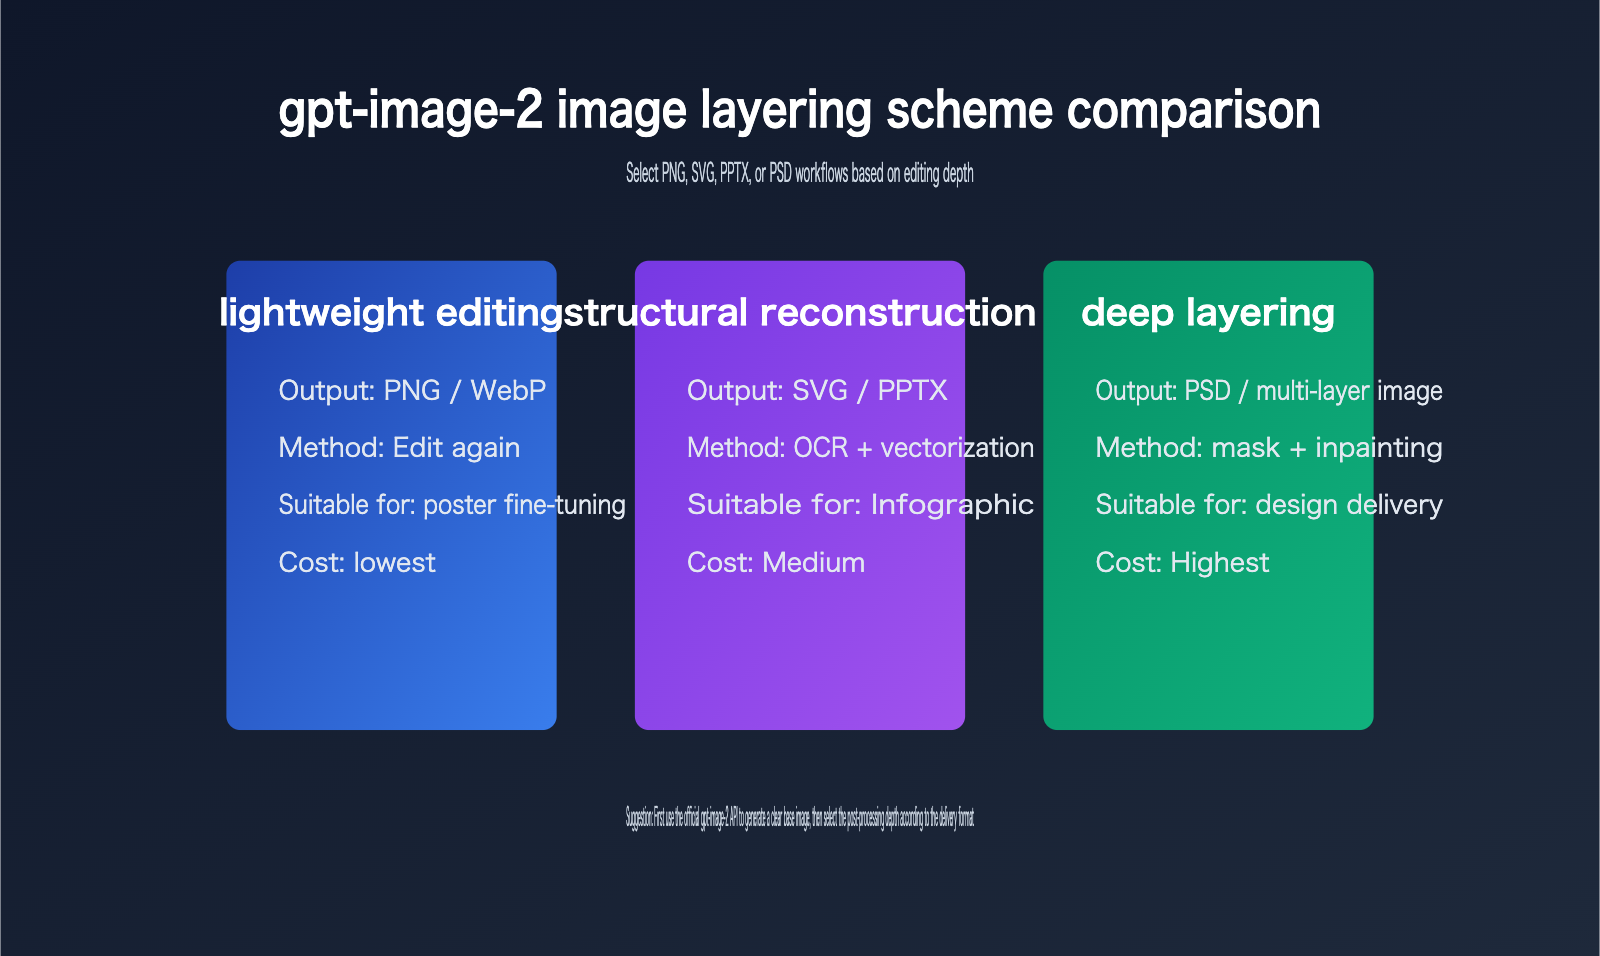
gpt-image-2 Image Layering Path 1: Continue Using Image Editing
If you only need to modify specific parts, the simplest approach isn't layering—it's continuing to use the gpt-image-2 editing tools.
For example, changing titles, adjusting colors, swapping backgrounds, replacing product images, or adding small icons can all be done via the image editing API.
This path has the lowest cost and the lowest system complexity.
The downside is that every edit requires regenerating a portion or the entire image; you can't precisely select individual layers like you would in design software.
It’s perfect for content operations, social media visuals, and quick posters.
gpt-image-2 Image Layering Path 2: Export to SVG or PPTX
If the image is a chart, flowchart, scientific poster, or infographic, rebuilding it as an SVG or PPTX is often more practical than a PSD.
This is because these types of images are usually composed of text, icons, lines, rectangles, arrows, and minor decorations.
OCR can identify text, vectorization can reconstruct lines and color blocks, and PPTX libraries can create editable text boxes.
This path is suitable for corporate knowledge bases, scientific presentations, sales materials, and training slides.
It doesn't aim for 100% pixel-perfect restoration, but rather "editability" and "visual similarity."
gpt-image-2 Image Layering Path 3: Generate PSD or Multi-layer Asset Packs
PSD layering is the most complex.
If you need to separate characters, products, backgrounds, text, shadows, and decorations into distinct layers, the system requires much stronger segmentation and inpainting capabilities.
For complex photographic-style images, automatic PSD generation is difficult to achieve at a professional designer's level.
A more realistic strategy is to generate a "semi-automated PSD": the system first separates the background, subject, text, and several key objects, and then a designer performs manual refinements.
This path is suitable for brand design, e-commerce main images, advertising creative, and high-value assets that require long-term reuse.
gpt-image-2 Image Layering FAQ
Can gpt-image-2 image layering output PSDs directly?
Based on the current public API, you shouldn't think of it as "directly outputting a PSD layer file."
The official documentation focuses on image generation, image editing, base64 image data, output formats, dimensions, quality, and token usage.
If a product can export a PSD, it usually means it has integrated Photoshop, a PSD writing library, or a self-developed post-processing module.
Is the Python code in gpt-image-2 image layering part of the model?
Generally, no.
The Python code users see is more likely an external workflow script.
It might be responsible for calling the API, saving images, running OCR, generating masks, inpainting backgrounds, vectorizing graphics, or writing to PPTX/PSD.
These scripts belong to the application layer, not the model itself.
Why does gpt-image-2 image layering look so much like real layers?
Because the post-processing system can reconstruct structure from pixels.
For example, after text recognition, it can become an editable text box.
The main subject can become an independent image layer via a mask.
The background can become a clean base layer after inpainting.
When these are stacked, it looks very much like an engineering file exported from design software.
Is gpt-image-2 image layering suitable for all images?
Not necessarily.
Images suitable for layering usually have clear layouts, distinct boundaries, minimal text, simple backgrounds, and elements that aren't highly overlapped.
Images that aren't suitable include complex photography, heavily textured illustrations, transparent materials, excessive fine decorations, and highly artistic compositions.
How can I improve the success rate of gpt-image-2 image layering?
Start by optimizing your prompt.
Ask the model to output clear structures, distinct boundaries, independent text areas, and low-complexity backgrounds.
Then, limit the image dimensions and style to prevent the post-processing system from dealing with too many details.
Finally, use a sample set to evaluate OCR accuracy, object segmentation accuracy, and manual correction time.
At the API call level, it's recommended to manage gpt-image-2 API proxy service requests centrally to easily track costs and failed samples.
Is it mandatory to use an API for gpt-image-2 image layering?
If you're just generating images occasionally for personal use, a graphical interface is fine.
If you need to perform batch generation, automated auditing, asset storage, editable file exports, or team collaboration, you should use the API.
The API makes every step traceable, retryable, and billable, and it's easier to integrate with internal Python post-processing services.
How should the "14% off" (86% of original price) for gpt-image-2 image layering be understood?
The user-mentioned pricing refers to accessing the gpt-image-2 API proxy service through the platform, which charges based on the official price while offering a 10% bonus on a $100 recharge.
From a purely mathematical perspective, $100 gets you $110 in balance, which is equivalent to about 90.9% of the unit cost.
If the platform displays "14% off official price" in promotional materials, comprehensive settlements, or specific channels, you should refer to the actual account balance, backend billing, and specific promotional terms.
When writing your budget, it's recommended to keep three columns: "Official Price," "Discounted Price after Bonus," and "Platform Promotional Discount" to avoid confusion in financial reporting.
Key Takeaways for gpt-image-2 Image Layering
- The core takeaway for gpt-image-2 image layering is this: the model typically outputs flattened images, and any multi-layer structure usually comes from post-processing toolchains.
- Python backend processing isn't magic; it's commonly used for model invocation, OCR, mask generation, inpainting, vectorization, and file exporting.
- If an API doesn't return PSD files, object trees, layer lists, or mask lists, it shouldn't be marketed as having native model-based layering capabilities.
- To improve the success rate of layering, your prompt must be designed to support post-processing—aim for clear composition and well-defined element boundaries.
- For light editing, you can keep using gpt-image-2; however, structured delivery is better suited for SVG/PPTX, and you should only consider PSD for deep design workflows.
- The official gpt-image-2 API is great for handling the generation side, while Python layering services are best managed by your own business systems.
- When calculating costs, make sure to factor in official model pricing, promotional credits, post-processing compute, retry logic for failures, and the time required for manual corrections.
gpt-image-2 Image Layering References
This article was written based on English-language web resources and cross-referenced with public API documentation.
- OpenAI GPT Image 2 Model Page: developers.openai.com/api/docs/models/gpt-image-2
- OpenAI Images and vision Documentation: developers.openai.com/api/docs/guides/images-vision
- OpenAI Images API Reference: developers.openai.com/api/reference/resources/images
- OpenAI API Pricing: openai.com/api/pricing
- Reddit GPT Image 2 Python skill discussion: reddit.com/r/ClaudeCode/comments/1stokpq
- Reddit GPT Image 2 to editable slide discussion: reddit.com/r/ChatGPT/comments/1suwjp8
These resources all point to one conclusion: while gpt-image-2 has powerful generation and editing capabilities, editable layers are typically the result of application-layer workflows.
Summary of gpt-image-2 Image Layering
When it comes to gpt-image-2 image layering, the most important thing isn't chasing a single answer like "is it native PSD?" but rather establishing the right system boundaries.
On the generation side, gpt-image-2 is responsible for turning your prompt and reference image into a high-quality image.
On the engineering side, the Python toolchain is responsible for parsing the flattened image into text, objects, backgrounds, and editable files.
By clearly separating these two stages, developers can more accurately evaluate performance, costs, and maintainability.
If your goal is to automate batch posters, PPT charts, product visuals, or design assets, I recommend using gpt-image-2 to generate a base image with a clear structure first, and then choosing SVG, PPTX, or PSD for post-processing based on your required delivery format.
For the integration layer, you can prioritize using the official gpt-image-2 API proxy service from APIYI (apiyi.com). It offers model invocation at official pricing, and you can lower your actual usage costs by taking advantage of their offer where you get a 10% bonus for every $100 topped up.
Once you manage "model capabilities," "post-processing," "delivery formats," and "cost structures" separately, gpt-image-2 image layering stops being some mysterious feature and becomes a verifiable, scalable, and production-ready visual generation workflow.
For technical discussions and model integration testing, check out APIYI (apiyi.com). It's a great fit for developer teams that need a unified way to call gpt-image-2, the GPT series, and other multimodal APIs.