
Released by OpenAI in April 2026, gpt-image-2 has quickly become the most talked-about model in the image generation space. It boasts 99% character-level text rendering accuracy, 4K high-definition output, native Chinese/CJK support, and integrated O-series reasoning capabilities. However, the first question many developers ask after getting their hands on the model is: How exactly do I connect to the official gpt-image-2 API? Which parameters are mandatory? How do I configure the base_url? And what should I do with the b64_json in the response?
This article is an end-to-end practical guide to connecting to the official gpt-image-2 API, covering every technical detail from SDK installation and base_url configuration to text-to-image, image editing, inpainting, and error handling. All code is based on the official OpenAI SDK and the APIYI official proxy channel (which is 100% compatible with official fields). Once you've finished this guide, your project will be ready to use gpt-image-2 in a production environment.
Preparation Checklist for Connecting to the gpt-image-2 Official API
Before you write your first line of code, you need to get your environment ready. The following checklist covers the four prerequisites for connecting to the gpt-image-2 official API.
Environment Checklist for gpt-image-2 API Connection
| Item | Requirement | Note |
|---|---|---|
| API Key | Valid Bearer Token | Apply via the APIYI console; register to get test credits |
| Python SDK | openai >= 1.50.0 |
Older versions don't support new images.generate() parameters |
| Node.js SDK | openai >= 4.50.0 |
TypeScript types are synced with the official ones |
| HTTP Timeout | ≥ 360 seconds | High quality + 2K/4K takes 3-5 minutes in real-world tests |
| Network | Direct access | api.apiyi.com is accessible from domestic, residential, and overseas nodes |
SDK Installation for gpt-image-2 API
Regardless of the language you choose, just install the official OpenAI SDK—the APIYI proxy channel is 100% consistent with official fields, so no extra client libraries are needed.
# Python
pip install --upgrade openai

# Node.js
npm install openai@latest

# If using yarn / pnpm
yarn add openai
pnpm add openai
How to Obtain an API Key for gpt-image-2
The process for getting an API key is extremely simple:
- Visit the APIYI console at
api.apiyi.com. - After registering, navigate to the "API Tokens" page.
- Create a new token (we recommend using separate tokens for different projects for easier auditing).
- Save the token to your environment variables (hardcoding it into your code is strongly discouraged).
🚀 Quick Start Tip: When connecting to the
gpt-image-2official API for the first time, we recommend starting with low quality and 1024×1024 resolution to verify the pipeline before switching to high quality and larger dimensions. We suggest claiming test credits via the APIYI platform; the free credits are sufficient to complete the entire PoC validation process.
# Add to your ~/.zshrc or ~/.bashrc
export APIYI_KEY="sk-your-token-here"
Configuring the base_url for gpt-image-2 Official API Integration
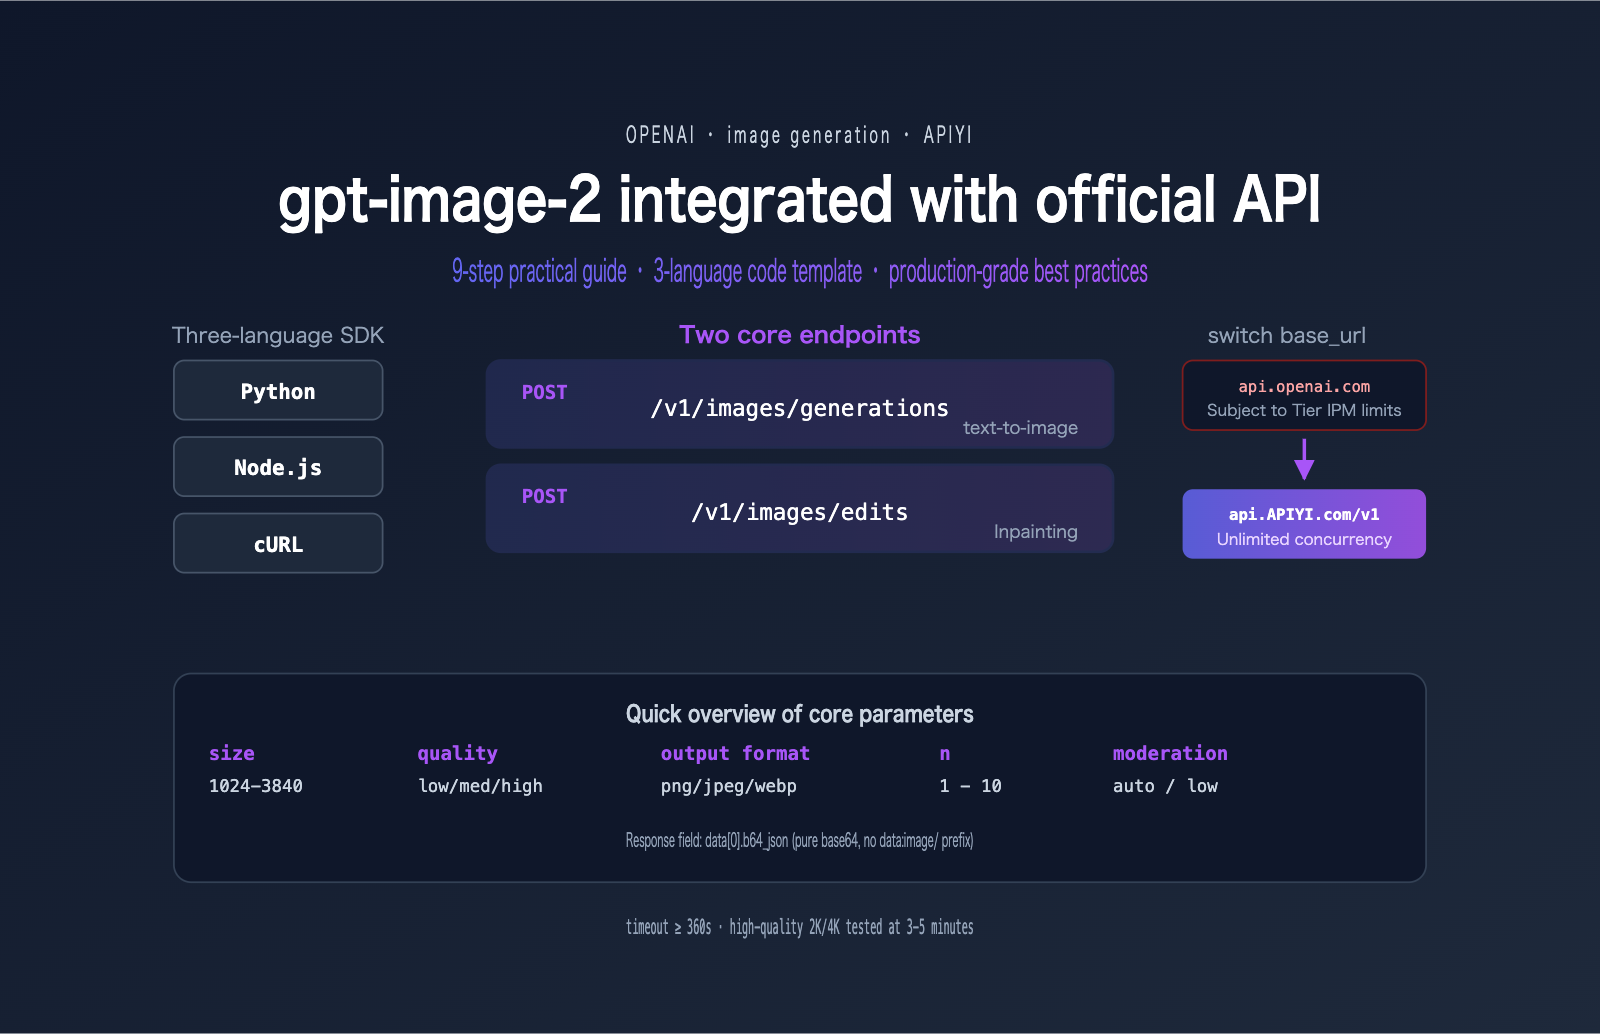
When integrating gpt-image-2 with the official API, the only difference from the native OpenAI SDK is the base_url. Simply replace api.openai.com with api.apiyi.com, and the rest of your code remains exactly the same.

Two Endpoints for gpt-image-2 Official API Integration
APIYI provides two image endpoints that are fully compatible with OpenAI:
| Endpoint | Purpose | Required Parameters |
|---|---|---|
POST /v1/images/generations |
text-to-image (prompt-based generation) | model, prompt |
POST /v1/images/edits |
image editing, multi-image fusion, mask inpainting | model, prompt, image |
Client Initialization for gpt-image-2 Official API Integration
Below is the client initialization code for Python and Node.js. Remember to set your timeout to at least 360 seconds.
# Python
import os
from openai import OpenAI

client = OpenAI(
    api_key=os.getenv("APIYI_KEY"),
    base_url="https://api.apiyi.com/v1",  # Switch to APIYI proxy channel
    timeout=600.0,                         # Must be extended for high-quality scenarios
    max_retries=2
)
// Node.js
import OpenAI from "openai";

const client = new OpenAI({
  apiKey: process.env.APIYI_KEY,
  baseURL: "https://api.apiyi.com/v1",  // Note: use baseURL (camelCase)
  timeout: 600 * 1000,                  // In milliseconds
  maxRetries: 2
});
💡 Timeout Tip: The default 60-second timeout will inevitably fail in high-quality + 2K/4K scenarios. We recommend setting request timeouts between 360 and 600 seconds for all production clients when using APIYI (apiyi.com) to prevent long-tail requests from being prematurely interrupted.
Text-to-Image Calls for gpt-image-2 Official API Integration
Let's get practical. Here is how to perform your first text-to-image call with gpt-image-2 using three different languages.
Python Text-to-Image for gpt-image-2
import base64
from openai import OpenAI

client = OpenAI(
    api_key=os.getenv("APIYI_KEY"),
    base_url="https://api.apiyi.com/v1",
    timeout=600.0
)

response = client.images.generate(
    model="gpt-image-2",
    prompt="A modern minimalist office desk with a vintage typewriter, soft morning light from the window, photorealistic, 8K",
    size="1536x1024",
    quality="high",
    output_format="jpeg",
    output_compression=92,
    n=1
)

# Key: APIYI returns a raw base64 string without the data:image/... prefix
b64 = response.data[0].b64_json
with open("output.jpg", "wb") as f:
    f.write(base64.b64decode(b64))

print("✓ Image saved to output.jpg")
Node.js Text-to-Image for gpt-image-2
import fs from "node:fs/promises";
import OpenAI from "openai";

const client = new OpenAI({
  apiKey: process.env.APIYI_KEY,
  baseURL: "https://api.apiyi.com/v1",
  timeout: 600_000
});

const response = await client.images.generate({
  model: "gpt-image-2",
  prompt: "An e-commerce product photo of a leather backpack on a marble desk, studio lighting",
  size: "1024x1024",
  quality: "high",
  output_format: "png",
  n: 1
});

const b64 = response.data[0].b64_json;
await fs.writeFile("output.png", Buffer.from(b64, "base64"));
console.log("✓ Image saved");
cURL Text-to-Image for gpt-image-2
cURL is great for quickly verifying your API key and testing new parameter combinations.
curl https://api.apiyi.com/v1/images/generations \
  -H "Authorization: Bearer $APIYI_KEY" \
  -H "Content-Type: application/json" \
  --max-time 600 \
  -d '{
    "model": "gpt-image-2",
    "prompt": "A futuristic cyberpunk city at night, neon signs in mixed Chinese and English",
    "size": "2048x1152",
    "quality": "high",
    "output_format": "jpeg",
    "output_compression": 90,
    "n": 1
  }' | jq -r '.data[0].b64_json' | base64 -d > output.jpg
Note: --max-time 600 is essential—cURL has no default timeout, but many shell wrappers impose a 60-second limit that will force an interruption.
Key Points for Handling Responses
Many developers get stuck on base64 parsing during their first integration. Here are a few common pitfalls:
# ✗ Error: APIYI does not return a url field
url = response.data[0].url  # AttributeError

# ✓ Correct: Use b64_json
b64 = response.data[0].b64_json

# ✗ Error: Browsers cannot render raw b64 strings directly
<img src="{b64}">  # Won't display

# ✓ Correct: Manually prepend the data URI scheme for browsers
data_uri = f"data:image/jpeg;base64,{b64}"
# <img src="{{ data_uri }}">

# ✓ Correct: Save to disk on the server
with open("output.jpg", "wb") as f:
    f.write(base64.b64decode(b64))
Comprehensive Guide to gpt-image-2 Official API Parameters
Mastering the range and use cases for every parameter is essential for taking gpt-image-2 from development to production.
Core Parameter Table for gpt-image-2 Official API
| Parameter | Value | Default | Description |
|---|---|---|---|
model |
"gpt-image-2" |
Required | Model ID |
prompt |
String | Required | Prompt, supports mixed Chinese and English |
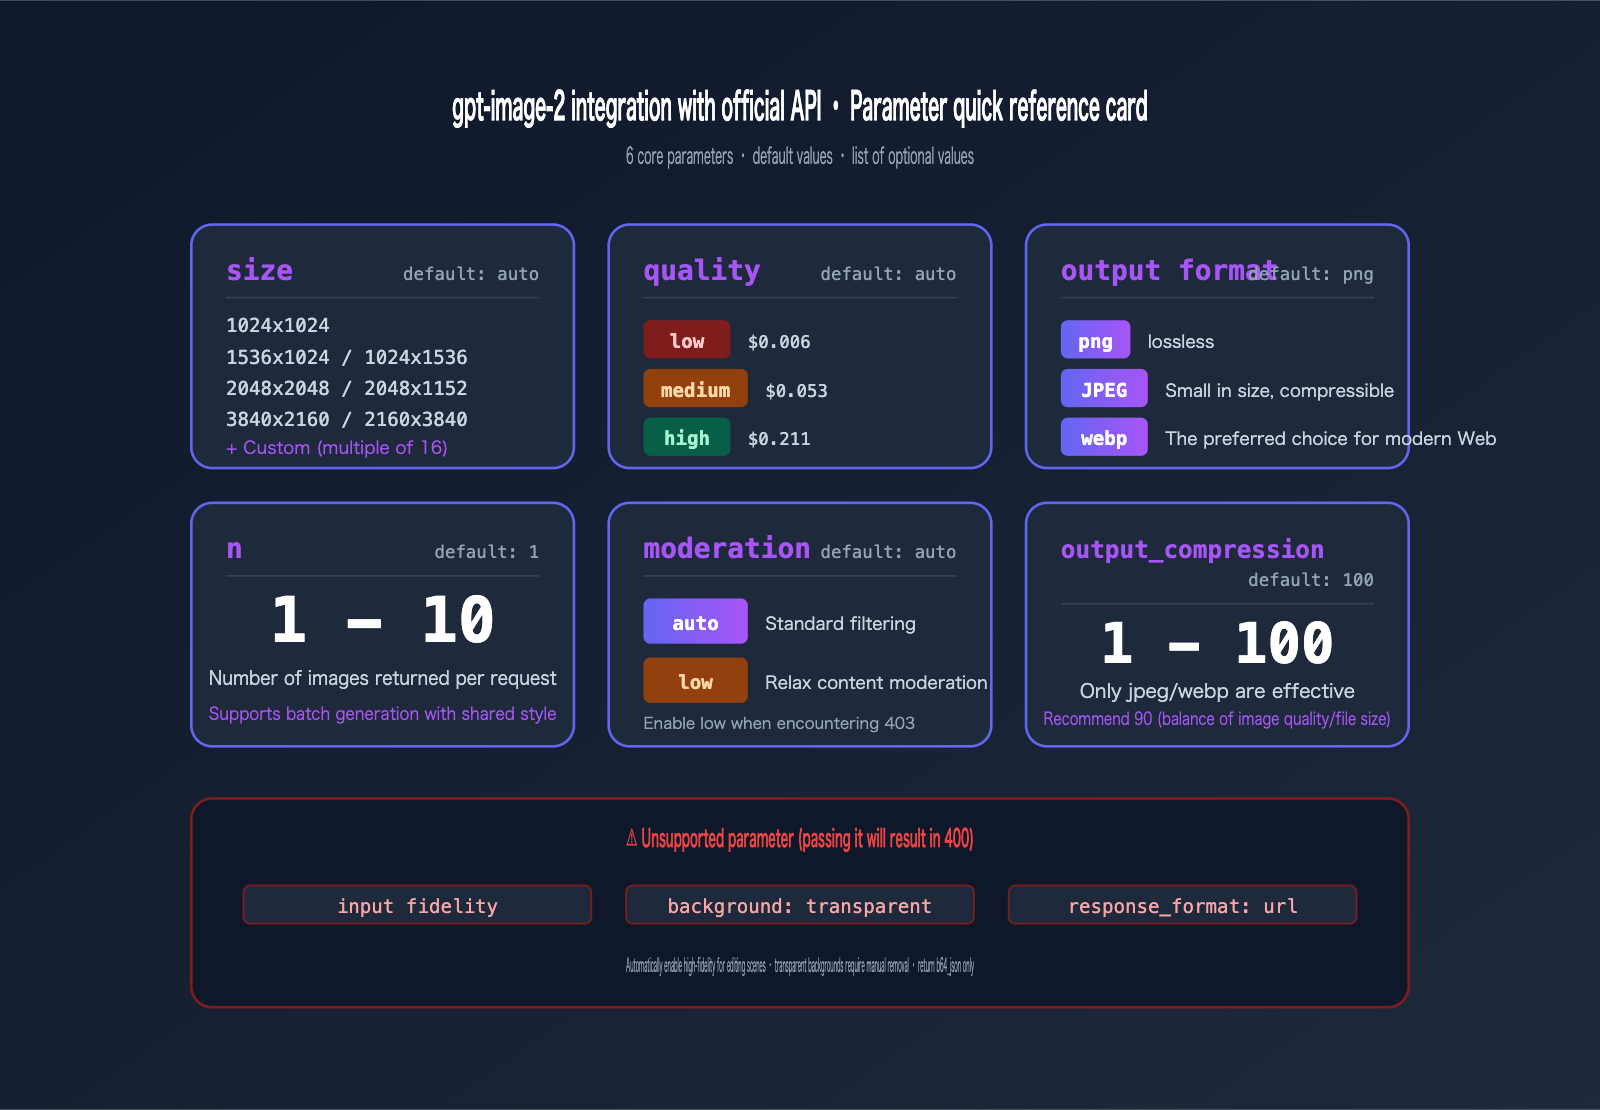
size |
8 presets + custom | auto |
See table below |
quality |
auto / low / medium / high |
auto |
Affects cost and latency |
output_format |
png / jpeg / webp |
png |
Recommend jpeg + 90 compression |
output_compression |
1-100 | 100 | Only applies to jpeg/webp |
moderation |
auto / low |
auto |
low reduces sensitivity |
n |
1-10 | 1 | Number of images per request |
Complete size Parameter Options for gpt-image-2
# 8 Official Presets
size = "1024x1024"   # 1:1 Standard square
size = "1536x1024"   # 3:2 Landscape
size = "1024x1536"   # 2:3 Portrait
size = "2048x2048"   # 2K Square
size = "2048x1152"   # 16:9 Landscape (for wallpapers/posters)
size = "3840x2160"   # 4K Landscape
size = "2160x3840"   # 4K Portrait (for phone wallpapers)
size = "auto"        # Automatically selected by the model
If you need custom dimensions, you must meet the following constraints:
✓ Side lengths must be multiples of 16
✓ Maximum side length ≤ 3840px
✓ Aspect ratio ≤ 3:1
✓ Total pixels between 655,360 and 8,294,400
For example, 1280x720 (720P) is valid, while 3840x1080 (ultrawide) will be rejected due to the > 3:1 ratio.
quality vs. Cost Comparison
quality is the parameter that impacts cost the most. Here is the full pricing table (per image):
| Quality | 1024×1024 | 1024×1536 | 1536×1024 | Use Case |
|---|---|---|---|---|
low |
$0.006 | $0.005 | $0.005 | Sketches, thumbnails, rapid iteration |
medium |
$0.053 | $0.041 | $0.041 | Content sites, social media images |
high |
$0.211 | $0.165 | $0.165 | Product images, posters, ads |
💰 Cost Optimization: For content teams generating 100+ images daily, using
mediumquality instead ofhighsaves 75% in costs. We recommend using the APIYI (apiyi.com) platform to first refine your prompt withlowquality, then upgrading tomedium/highfor final output. This can reduce your monthly image generation budget by 30-50%.
Choosing output_format for gpt-image-2
The output format directly impacts storage costs and loading speeds:
# Need a transparent background? gpt-image-2 doesn't support it and will return a 400
# ✗ output_format="png", background="transparent" → 400 Bad Request

# Web/Mini-program display: jpeg + 90 compression
output_format="jpeg", output_compression=90

# High-fidelity archiving: png (lossless)
output_format="png"

# Modern Web Apps: webp for smallest file size
output_format="webp", output_compression=85
Image Editing and Inpainting with gpt-image-2 via Official API
Beyond text-to-image generation, gpt-image-2 also supports three major editing scenarios: image editing, multi-image blending, and local inpainting/outpainting.

gpt-image-2 Image Editing (Reference Image Mode)
Reference image editing automatically enables high-fidelity mode, so don't pass the input_fidelity parameter (it will be rejected).
from openai import OpenAI

client = OpenAI(
    api_key=os.getenv("APIYI_KEY"),
    base_url="https://api.apiyi.com/v1"
)

# Single reference image editing
with open("source.jpg", "rb") as img:
    response = client.images.edit(
        model="gpt-image-2",
        image=img,
        prompt="Change the background to a sunset beach, keeping the foreground character's pose and clothing",
        size="1024x1024",
        quality="high"
    )
gpt-image-2 Multi-Image Blending (Up to 16 Images)
The /images/edits endpoint supports up to 16 reference images simultaneously. You can refer to them in your prompt as "Image 1", "Image 2", "Image 3", etc.
images = [
    open("character.jpg", "rb"),     # Image 1: Character
    open("background.jpg", "rb"),    # Image 2: Background
    open("outfit.jpg", "rb"),        # Image 3: Clothing reference
]

response = client.images.edit(
    model="gpt-image-2",
    image=images,
    prompt="Place the character from Image 1 into the background of Image 2, and have the character wear the clothing style from Image 3, maintaining a cinematic quality",
    size="2048x1152",
    quality="high"
)
This capability is incredibly powerful for scenarios like e-commerce product background replacement, virtual try-ons, and manga storyboard generation.
gpt-image-2 Inpainting (Local Redrawing)
Inpainting uses the mask parameter to specify the area to be redrawn. Key rules:
- The mask must have the same dimensions as the first reference image.
- The mask must be a PNG with an alpha channel.
- Transparent areas = areas to be redrawn.
- Opaque areas = areas to keep from the original image.
with open("photo.png", "rb") as img, open("mask.png", "rb") as msk:
    response = client.images.edit(
        model="gpt-image-2",
        image=img,
        mask=msk,
        prompt="Replace the area in the red box with an orange cat",
        size="1024x1024",
        quality="high"
    )
If you need to programmatically generate a mask in Python, you can use PIL:
from PIL import Image

# Create a mask with the same size as the original image, default to solid black (opaque = keep)
mask = Image.new("RGBA", (1024, 1024), (0, 0, 0, 255))

# Change the area to be redrawn to transparent (alpha=0)
for x in range(400, 700):
    for y in range(300, 600):
        mask.putpixel((x, y), (0, 0, 0, 0))

mask.save("mask.png")
When moving gpt-image-2 model invocation to production, you need to handle three critical areas: error codes, concurrency, and timeouts.
Complete Error Code Table for gpt-image-2 Official API
| HTTP Status | Meaning | Recommended Action |
|---|---|---|
400 |
Invalid parameters (e.g., size out of bounds, unsupported fields) | Validate input; do not pass input_fidelity or background:transparent |
401 |
Invalid token | Check Bearer Token and ensure it hasn't expired |
403 |
Content moderation block | Adjust the prompt or add moderation: "low" |
429 |
Rate limit / Insufficient balance | Exponential backoff retry + check balance |
5xx |
Gateway or backend error | Retry 1-2 times, then alert if it still fails |
| Timeout | Long-tail request failed to respond | Set client timeout to ≥ 360 seconds |
Exponential Backoff Retry for gpt-image-2
Here is a production-grade retry wrapper that handles 429 and 5xx errors:
import time
import random
from openai import OpenAI, RateLimitError, APIStatusError

client = OpenAI(
    api_key=os.getenv("APIYI_KEY"),
    base_url="https://api.apiyi.com/v1",
    timeout=600.0
)

def generate_with_retry(prompt: str, max_retries: int = 5):
    delay = 1.0
    for attempt in range(max_retries):
        try:
            return client.images.generate(
                model="gpt-image-2",
                prompt=prompt,
                size="1024x1024",
                quality="high"
            )
        except RateLimitError:
            sleep = delay + random.uniform(0, 0.5)
            print(f"429 Rate limited, retrying in {sleep:.1f}s ({attempt+1}/{max_retries})")
            time.sleep(sleep)
            delay *= 2
        except APIStatusError as e:
            if 500 <= e.status_code < 600 and attempt < max_retries - 1:
                time.sleep(delay)
                delay *= 2
                continue
            raise
    raise RuntimeError("Exceeded maximum retry attempts")
Concurrency Control for gpt-image-2
For batch tasks, use asyncio.Semaphore to limit concurrency and avoid overwhelming the downstream service:
import asyncio
from openai import AsyncOpenAI

aclient = AsyncOpenAI(
    api_key=os.getenv("APIYI_KEY"),
    base_url="https://api.apiyi.com/v1",
    timeout=600.0
)

async def gen_one(prompt: str, sem: asyncio.Semaphore):
    async with sem:
        return await aclient.images.generate(
            model="gpt-image-2",
            prompt=prompt,
            size="1024x1024",
            quality="medium"
        )

async def batch(prompts: list[str], concurrency: int = 30):
    sem = asyncio.Semaphore(concurrency)
    return await asyncio.gather(*[gen_one(p, sem) for p in prompts])

# Run 200 images with 30 concurrent requests
prompts = [f"Product scene variant #{i}" for i in range(200)]
results = asyncio.run(batch(prompts))
Cost Estimation for gpt-image-2
Perform a cost estimate before going to production. Here are monthly estimates for typical scenarios:
| Business Scenario | Daily Volume | Quality | Monthly Cost Estimate |
|---|---|---|---|
| Social Media Images | 30 | medium | ~$48 |
| E-commerce Product Images | 200 | high | ~$1266 |
| SaaS User Generation | 1000 | medium | ~$1590 |
| Game Keyframes | 500 | high | ~$3165 |
🎯 Production Deployment Tip: We recommend requesting separate API keys for different business lines to facilitate cost attribution and rate limit isolation. We suggest enabling billing alerts via the APIYI (apiyi.com) console to receive automatic notifications when monthly consumption hits a threshold, preventing budget overruns.
Observability for gpt-image-2
Always log key metrics for every request in your production environment:
import time
import logging

logger = logging.getLogger("gpt-image-2")

def call_with_metrics(prompt: str, **params):
    start = time.perf_counter()
    try:
        resp = client.images.generate(model="gpt-image-2", prompt=prompt, **params)
        latency = time.perf_counter() - start
        logger.info(
            "gpt-image-2 ok",
            extra={
                "latency_ms": int(latency * 1000),
                "size": params.get("size"),
                "quality": params.get("quality"),
                "n": params.get("n", 1)
            }
        )
        return resp
    except Exception as e:
        logger.error(f"gpt-image-2 failed: {type(e).__name__}: {e}")
        raise
FAQ: Common Questions about gpt-image-2 Official API
Q1: Why do I get a 400 error for input_fidelity?
gpt-image-2 automatically enables high-fidelity for all editing scenarios, so the input_fidelity parameter is rejected. Simply remove this parameter. If you are migrating from gpt-image-1, perform a global search and remove it. We recommend comparing parameter differences between models via the APIYI (apiyi.com) documentation: docs.apiyi.com.
Q2: Why does the API call often time out?
High quality + 2K/4K image generation typically takes 3-5 minutes. If your client defaults to a 60-second timeout, it will inevitably fail. Fix: Set the timeout to 360-600 seconds. For the Python SDK, use OpenAI(timeout=600), for Node.js use timeout: 600_000, and for cURL use --max-time 600.
Q3: How do I display the b64_json returned by the API on a webpage?
The API returns a raw base64 string without a prefix, which browsers cannot render directly. You need to concatenate it:
const dataUri = `data:image/${format};base64,${b64}`;
imgElement.src = dataUri;
For backend services, we recommend decoding the base64 and saving it to OSS/CDN, then serving the URL to the frontend to avoid bloating your HTML with base64 strings, which can hurt initial load speed. We suggest testing via the APIYI (apiyi.com) platform using cURL + base64 decoding to a local file to verify the pipeline before implementing a full storage and distribution architecture.
Q4: Can I generate images with transparent backgrounds?
Currently, gpt-image-2 does not support transparent backgrounds. Passing background: "transparent" will result in a 400 error. Workaround: Generate an image with a solid white/green background, then use a client-side tool (like the rembg library) to remove the background.
Q5: How do I use the thinking parameter?
thinking is an inference parameter introduced in gpt-image-2 (off / low / medium / high). When enabled, the model plans the layout before generating, resulting in higher quality but significantly higher costs (the high mode costs about 4-5 times the base rate). Recommendation: Use medium only for text-heavy posters or complex compositions; keep it off for standard scenarios. We suggest running A/B tests via the APIYI (apiyi.com) unified interface before deciding whether to enable it permanently.
Q6: What should I do if I encounter a 403 content moderation error?
First, try adding moderation: "low" to your request to lower sensitivity. If it is still blocked, it means the prompt triggered a core safety policy (e.g., violence, inappropriate content involving minors, or portraits of famous figures), and you will need to rewrite the prompt. Note: moderation: "low" does not disable moderation; it only relaxes it, and high-risk content will still be blocked.
Q7: What happens if the base_url is incorrect?
If you write https://api.apiyi.com (missing /v1), the SDK will construct the URL as api.apiyi.com/images/generations, resulting in a 404. The correct URL is https://api.apiyi.com/v1. Python uses base_url, while Node.js uses baseURL (camelCase)—be careful with the casing.
Q8: What are the best practices for multi-image fusion?
You can use up to 16 reference images, referring to them in the prompt as "Image 1/Image 2". Key tips:
- The first reference image is usually treated as the "subject," and the model will prioritize preserving its structure.
- For complex instructions, break it down: write "Use Image 1 as the subject," then "blend the color tone of Image 2."
- Multi-image editing costs 1.5-2 times more than text-to-image; use with caution if you are budget-sensitive.
- We recommend testing the logic with 2-3 images before scaling up to more reference images.
Summary: A Complete Review of Integrating gpt-image-2 via Official API
After working through these 9 chapters, you should now have a solid grasp of the end-to-end engineering process for integrating gpt-image-2 via the official API:
- ✅ Preparation — Upgrade your SDK to the latest version and set your timeout to ≥ 360 seconds.
- ✅ base_url Configuration — Replace it with
https://api.apiyi.com/v1; the rest of your code remains identical to the official implementation. - ✅ Text-to-Image Invocation — Templates available in Python, Node.js, and cURL.
- ✅ Parameter Breakdown — 8 preset sizes + custom options, 3 quality levels, and 3 output formats.
- ✅ Image Editing — Support for up to 16 reference images, using "image1/image2" in your prompt to reference them.
- ✅ Inpainting — Utilize the mask alpha channel to redraw specific transparent areas.
- ✅ Error Handling — Comprehensive strategies for 400, 401, 403, 429, and 5xx status codes.
- ✅ Production Best Practices — Exponential backoff, concurrency control, cost estimation, and observability.
A final piece of advice for implementation: Start by running a "Hello World" using low quality and 1024×1024 resolution, then gradually increase the complexity. This approach helps you quickly identify basic issues with SDK versions, timeouts, or your API key, preventing you from wasting debugging time on long-tail requests involving high quality and 4K resolutions.
If your team is currently evaluating a gpt-image-2 integration strategy, or if you're already writing your first version and running into parameter errors or timeouts, I recommend applying for a test key via APIYI at apiyi.com to run the code templates provided in this guide. All examples are based on the official SDK and the APIYI API proxy service (with 100% field compatibility), ensuring high portability for your own projects.
References
-
OpenAI gpt-image-2 Model Documentation: Authoritative guide on model capabilities, parameters, and pricing.
- Link:
developers.openai.com/api/docs/models/gpt-image-2 - Note: Includes core features like 4K rendering, character-level text, and reasoning integration.
- Link:
-
OpenAI Image Generation Guide: Complete workflows for text-to-image, editing, and inpainting.
- Link:
developers.openai.com/api/docs/guides/image-generation - Note: Covers detailed explanations of size, quality, and format parameters.
- Link:
-
OpenAI Create Image API Reference: Full field documentation for the
/v1/images/generationsendpoint.- Link:
developers.openai.com/api/reference/resources/images/methods/generate - Note: Authoritative reference for request and response fields.
- Link:
-
APIYI Official Documentation: Comprehensive Chinese guide for gpt-image-2 integration.
- Link:
docs.apiyi.com/api-capabilities/gpt-image-2/overview - Note: Includes cURL, Python, and Node.js examples, plus error code handling.
- Link:
-
OpenAI Cookbook · Rate Limits: Exponential backoff strategies for 429 errors.
- Link:
developers.openai.com/cookbook/examples/how_to_handle_rate_limits - Note: Official recommended code templates for handling rate limits.
- Link:
Author: APIYI Technical Team
Published: April 27, 2026
Keywords: gpt-image-2 official API integration, base_url, text-to-image, image editing, inpainting, APIYI, OpenAI SDK