
Want to connect MoltBot to Claude Opus 4.5 or other Large Language Models but aren't sure how to configure an API proxy? This guide will walk you through the MoltBot Multi-Provider configuration step-by-step, allowing your AI assistant to connect to multiple model services simultaneously for smart switching and disaster recovery.
Core Value: By the end of this article, you'll master the models.providers configuration in MoltBot and learn how to set up primary models, fallbacks, and model aliases to build a stable and reliable AI assistant.
MoltBot API Proxy Configuration: Core Concepts Explained
MoltBot supports connecting to nearly all major Large Language Model services via OpenAI-compatible APIs. Understanding the following core concepts is key to a successful configuration.
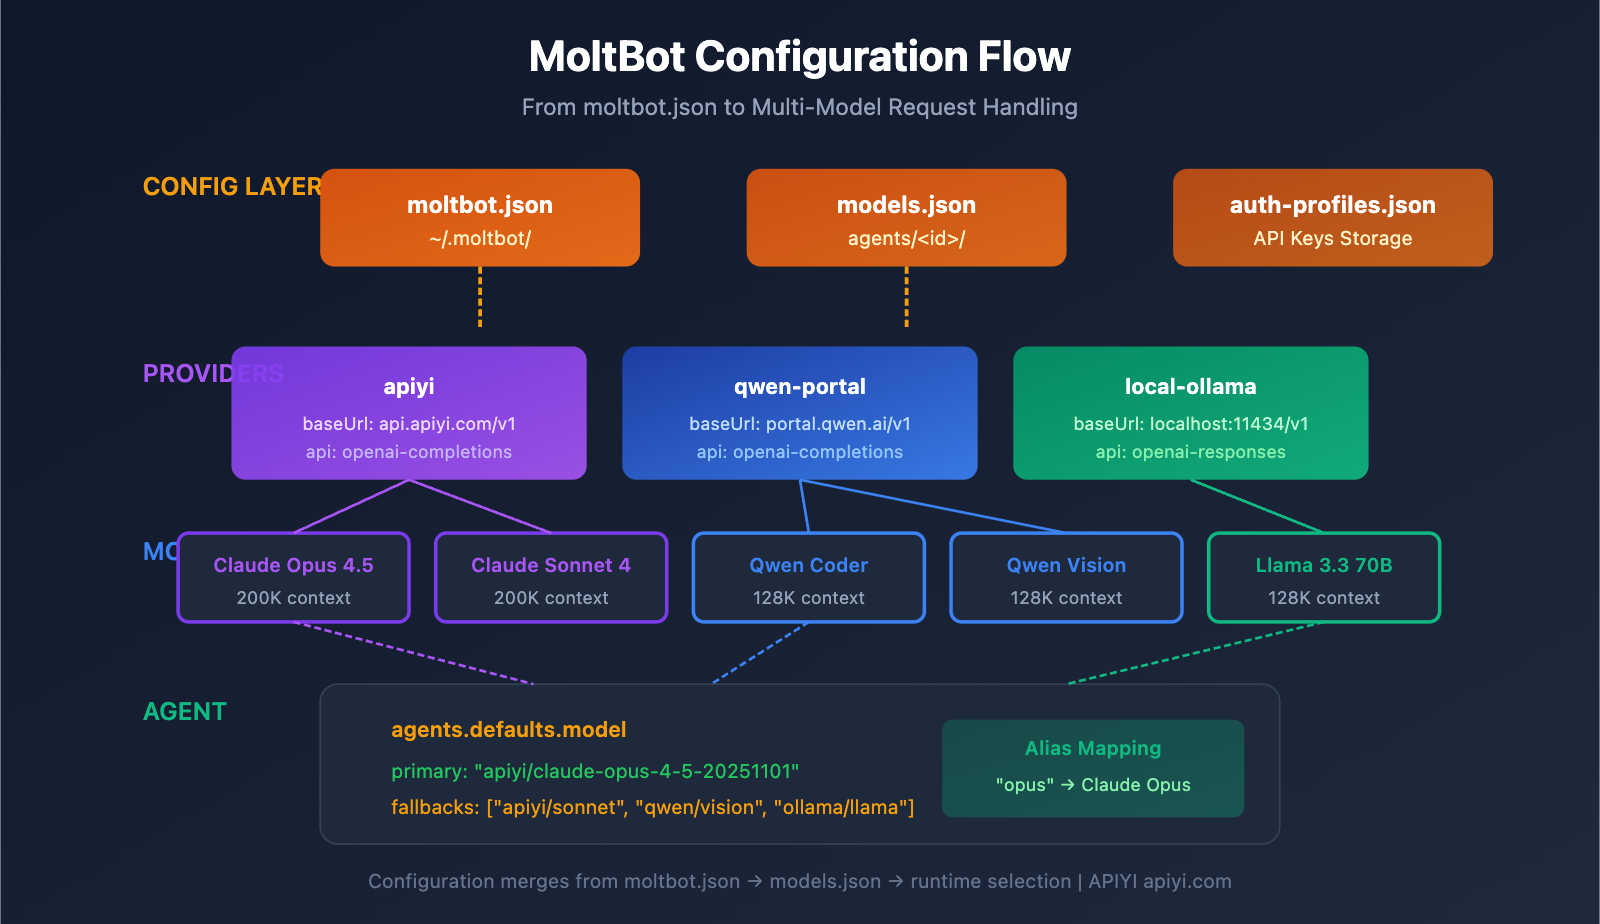
MoltBot Configuration System
| Config File | Location | Purpose |
|---|---|---|
| moltbot.json | ~/.moltbot/ |
Global configuration entry |
| models.json | ~/.moltbot/agents/<agentId>/ |
Agent-level model configuration |
| auth-profiles.json | ~/.moltbot/agents/<agentId>/ |
Authentication info storage |
MoltBot Provider Configuration: Core Fields
Each Provider configuration includes the following key fields:
| Field | Type | Description | Required |
|---|---|---|---|
baseUrl |
string | API endpoint address | Yes |
apiKey |
string | API key (supports environment variables) | Yes |
api |
string | API protocol type | Yes |
models |
array | List of available models | Yes |
API Protocol Types
MoltBot supports two mainstream OpenAI-compatible protocols:
| Protocol Type | Description | Use Case |
|---|---|---|
openai-completions |
Standard Chat Completions API | Most proxy services |
openai-responses |
Responses API (includes tool calls) | Local models, advanced scenarios |
🎯 Configuration Tip: Most API proxy services (such as APIYI apiyi.com) use the
openai-completionsprotocol. If you're using locally deployed LM Studio or Ollama, you'll need to useopenai-responses.
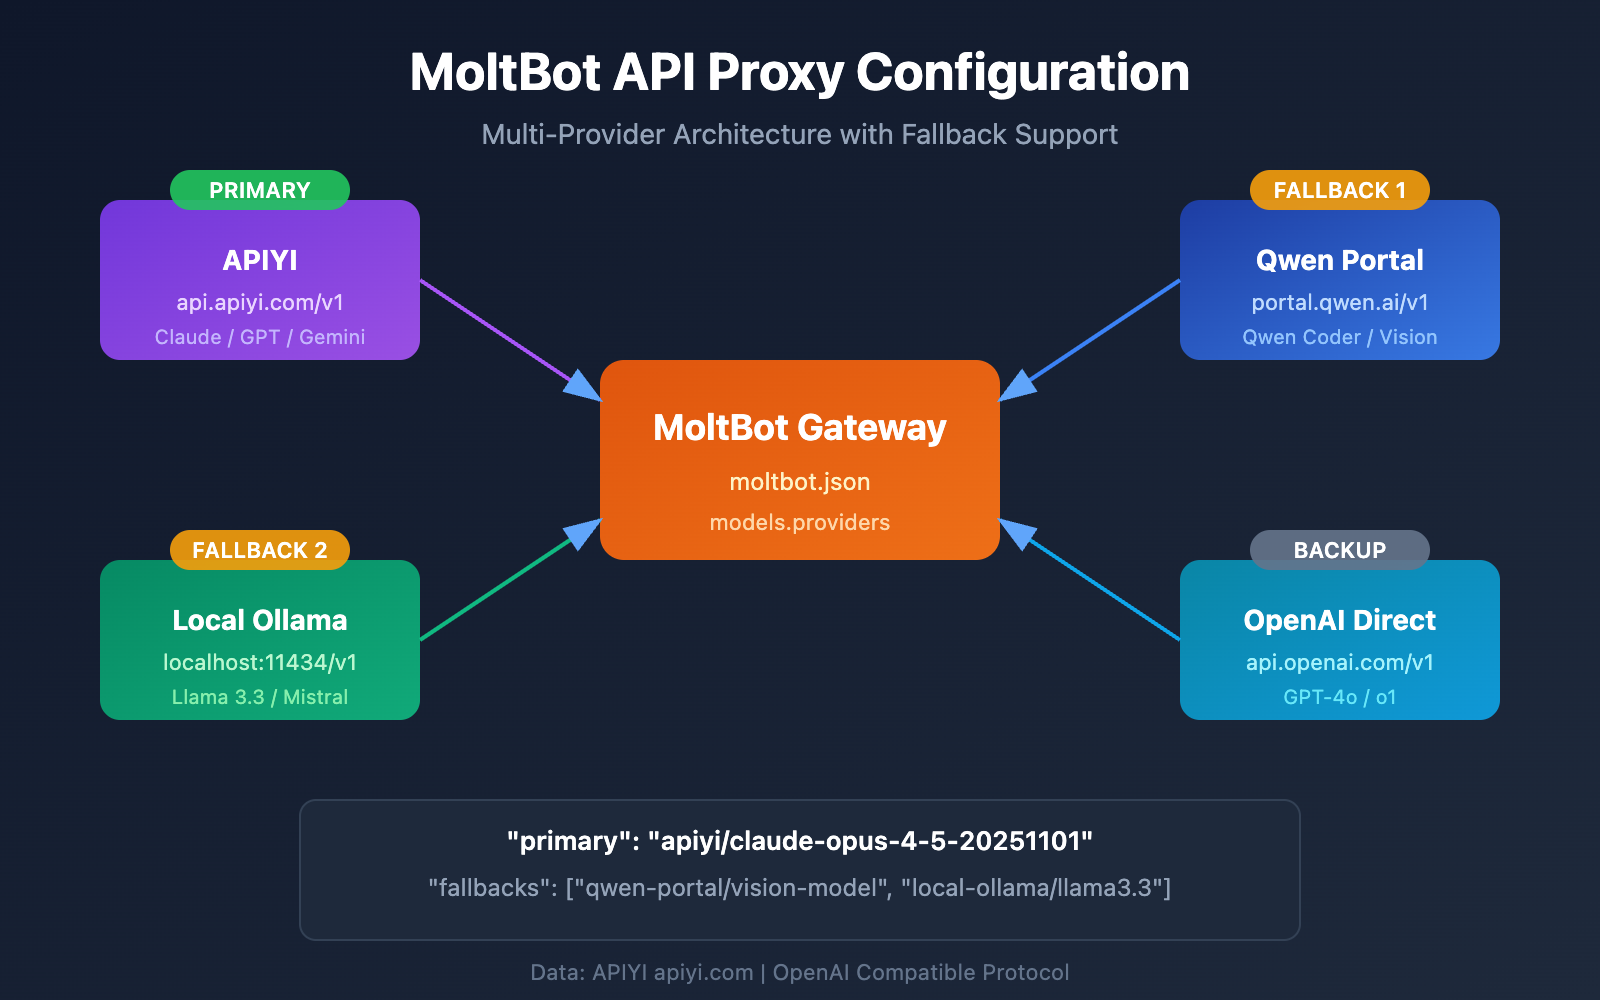
MoltBot Multi-Provider Configuration: A Complete Example
Here’s a real-world example of a multi-provider configuration, integrating both APIYI and Qwen Portal services:
Complete Configuration File Example
{
  "models": {
    "providers": {
      "qwen-portal": {
        "baseUrl": "https://portal.qwen.ai/v1",
        "apiKey": "${QWEN_API_KEY}",
        "api": "openai-completions",
        "models": [
          { "id": "coder-model", "name": "Qwen Coder", "contextWindow": 128000 },
          { "id": "vision-model", "name": "Qwen Vision", "contextWindow": 128000 }
        ]
      },
      "apiyi": {
        "baseUrl": "https://api.apiyi.com/v1",
        "apiKey": "${APIYI_API_KEY}",
        "api": "openai-completions",
        "models": [
          { "id": "claude-opus-4-5-20251101", "name": "Claude Opus 4.5", "contextWindow": 200000 },
          { "id": "claude-sonnet-4-20250514", "name": "Claude Sonnet 4", "contextWindow": 200000 },
          { "id": "gpt-4o", "name": "GPT-4o", "contextWindow": 128000 }
        ]
      }
    }
  },
  "agents": {
    "defaults": {
      "model": {
        "primary": "apiyi/claude-opus-4-5-20251101",
        "fallbacks": ["qwen-portal/vision-model"]
      },
      "models": {
        "apiyi/claude-opus-4-5-20251101": { "alias": "opus" },
        "apiyi/claude-sonnet-4-20250514": { "alias": "sonnet" },
        "qwen-portal/coder-model": { "alias": "qwen" }
      }
    }
  },
  "channels": {
    "telegram": {
      "enabled": true,
      "botToken": "${TELEGRAM_BOT_TOKEN}"
    }
  }
}
Configuration Structure Breakdown
1. The models.providers Section
This is where you define your API proxy services:
"providers": {
  "apiyi": {
    "baseUrl": "https://api.apiyi.com/v1",
    "apiKey": "${APIYI_API_KEY}",
    "api": "openai-completions",
    "models": [...]
  }
}
- Provider ID (
apiyi): A custom identifier for the service, used when referencing it later. - baseUrl: The API endpoint, which must end with
/v1. - apiKey: You can enter this directly or use a
${ENV_VAR}environment variable. - models: A list of models supported by this provider.
2. The agents.defaults.model Section
This defines the default model and the failover (disaster recovery) strategy:
"model": {
  "primary": "apiyi/claude-opus-4-5-20251101",
  "fallbacks": ["qwen-portal/vision-model"]
}
- primary: Your main model, formatted as
provider-id/model-id. - fallbacks: An array of backup models that the system automatically switches to if the primary model fails.
3. The agents.defaults.models Section
This defines model aliases to make switching easier:
"models": {
  "apiyi/claude-opus-4-5-20251101": { "alias": "opus" },
  "qwen-portal/coder-model": { "alias": "qwen" }
}
Once an alias is set, you can quickly switch models in a chat using the /model opus command.
MoltBot API Proxy Configuration: Step-by-Step Tutorial
Step 1: Get Your API Key
Before you start configuring, you'll need to have your API Key ready:
| Provider | How to Get | Supported Models |
|---|---|---|
| APIYI | Register at apiyi.com | Full Claude series, full GPT series, Gemini, etc. |
| Qwen Portal | Visit portal.qwen.ai | Qwen series models |
| OpenAI | Visit platform.openai.com | GPT series |
| Anthropic | Visit console.anthropic.com | Claude series |
🚀 Quick Start: We recommend using APIYI (apiyi.com) as your primary provider. You can access major models like Claude, GPT, and Gemini with a single API Key, so there's no need to register on multiple platforms.
Step 2: Set Environment Variables
For security reasons, it's best to store your API Keys in environment variables:
# Linux/macOS - Add to ~/.bashrc or ~/.zshrc
export APIYI_API_KEY="sk-your-apiyi-key"
export QWEN_API_KEY="your-qwen-key"
export TELEGRAM_BOT_TOKEN="your-telegram-token"

# Apply the changes
source ~/.bashrc
# Windows PowerShell
$env:APIYI_API_KEY = "sk-your-apiyi-key"
$env:QWEN_API_KEY = "your-qwen-key"
$env:TELEGRAM_BOT_TOKEN = "your-telegram-token"
Step 3: Edit the Configuration File
Open or create the MoltBot configuration file:
# Open the configuration file
nano ~/.moltbot/moltbot.json

# Or use VS Code
code ~/.moltbot/moltbot.json
Paste the following configuration into the file:
{
  "models": {
    "providers": {
      "apiyi": {
        "baseUrl": "https://api.apiyi.com/v1",
        "apiKey": "${APIYI_API_KEY}",
        "api": "openai-completions",
        "models": [
          {
            "id": "claude-opus-4-5-20251101",
            "name": "Claude Opus 4.5",
            "contextWindow": 200000
          }
        ]
      }
    }
  },
  "agents": {
    "defaults": {
      "model": {
        "primary": "apiyi/claude-opus-4-5-20251101"
      }
    }
  }
}
Step 4: Verify the Configuration
Restart MoltBot and check if the configuration is working:
# Restart MoltBot
moltbot restart

# Check the current model configuration
moltbot models list

# Test a model call
moltbot chat "Hello, please tell me which model you are."
View the full multi-provider configuration example
{
  "models": {
    "mode": "merge",
    "providers": {
      "apiyi": {
        "baseUrl": "https://api.apiyi.com/v1",
        "apiKey": "${APIYI_API_KEY}",
        "api": "openai-completions",
        "models": [
          {
            "id": "claude-opus-4-5-20251101",
            "name": "Claude Opus 4.5",
            "contextWindow": 200000,
            "maxTokens": 32000
          },
          {
            "id": "claude-sonnet-4-20250514",
            "name": "Claude Sonnet 4",
            "contextWindow": 200000,
            "maxTokens": 64000
          },
          {
            "id": "gpt-4o",
            "name": "GPT-4o",
            "contextWindow": 128000,
            "maxTokens": 16384
          },
          {
            "id": "gemini-2.5-pro",
            "name": "Gemini 2.5 Pro",
            "contextWindow": 1000000,
            "maxTokens": 65536
          }
        ]
      },
      "qwen-portal": {
        "baseUrl": "https://portal.qwen.ai/v1",
        "apiKey": "${QWEN_API_KEY}",
        "api": "openai-completions",
        "models": [
          {
            "id": "coder-model",
            "name": "Qwen Coder",
            "contextWindow": 128000
          },
          {
            "id": "vision-model",
            "name": "Qwen Vision",
            "contextWindow": 128000
          }
        ]
      },
      "local-ollama": {
        "baseUrl": "http://localhost:11434/v1",
        "apiKey": "ollama-local",
        "api": "openai-responses",
        "models": [
          {
            "id": "llama3.3:70b",
            "name": "Llama 3.3 70B",
            "contextWindow": 128000
          }
        ]
      }
    }
  },
  "agents": {
    "defaults": {
      "model": {
        "primary": "apiyi/claude-opus-4-5-20251101",
        "fallbacks": [
          "apiyi/claude-sonnet-4-20250514",
          "qwen-portal/vision-model",
          "local-ollama/llama3.3:70b"
        ]
      },
      "models": {
        "apiyi/claude-opus-4-5-20251101": {
          "alias": "opus",
          "params": { "temperature": 0.7 }
        },
        "apiyi/claude-sonnet-4-20250514": {
          "alias": "sonnet",
          "params": { "temperature": 0.5 }
        },
        "apiyi/gpt-4o": {
          "alias": "gpt"
        },
        "qwen-portal/coder-model": {
          "alias": "qwen"
        },
        "local-ollama/llama3.3:70b": {
          "alias": "llama"
        }
      },
      "imageModel": "apiyi/gpt-4o"
    }
  },
  "channels": {
    "telegram": {
      "enabled": true,
      "botToken": "${TELEGRAM_BOT_TOKEN}"
    },
    "discord": {
      "enabled": false,
      "token": "${DISCORD_BOT_TOKEN}"
    }
  }
}
💡 Configuration Tip: Using
"mode": "merge"lets you keep MoltBot's built-in model settings while adding your own custom providers. This way, if your custom service becomes unavailable, the system can fall back to the default configuration.
MoltBot Model Configuration: Advanced Parameter Details
Full Fields for Model Entries
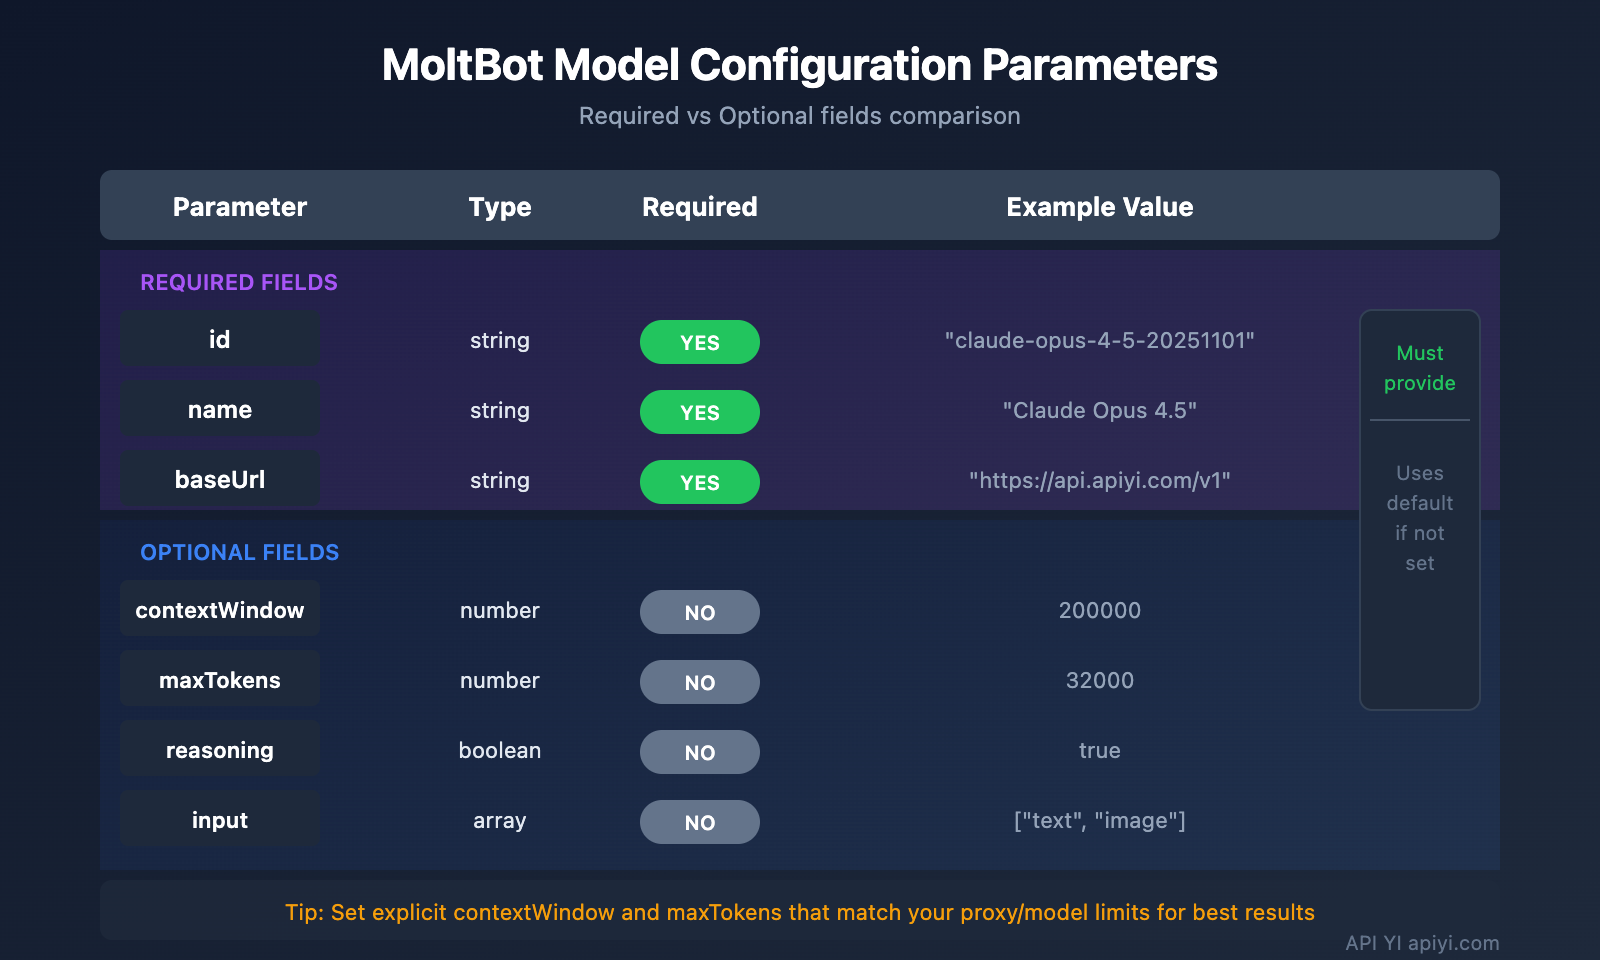
| Parameter | Type | Required | Description | Example |
|---|---|---|---|---|
id |
string | Yes | Model ID used for calls | claude-opus-4-5-20251101 |
name |
string | Yes | Display name | Claude Opus 4.5 |
contextWindow |
number | No | Context window size | 200000 |
maxTokens |
number | No | Maximum output tokens | 32000 |
reasoning |
boolean | No | Whether it supports reasoning mode | true |
input |
array | No | Supported input types | ["text", "image"] |
cost |
object | No | Pricing information | {"input": 15, "output": 75} |
Model Parameter Configuration (params)
You can set default parameters for each model within agents.defaults.models:
"models": {
  "apiyi/claude-opus-4-5-20251101": {
    "alias": "opus",
    "params": {
      "temperature": 0.7,
      "maxTokens": 16000
    }
  }
}
| Parameter | Range | Description |
|---|---|---|
temperature |
0-2 | Controls output randomness; lower is more deterministic |
maxTokens |
1 to model limit | Maximum output length for a single request |
⚠️ Note:
temperatureis an advanced parameter. Unless you're familiar with the model's default settings and specifically need to adjust them, it's usually better to leave this unset.
MoltBot Fallback Configuration
The fallback mechanism is a core feature of MoltBot, ensuring your AI assistant stays available even if a specific service hits a snag.
How Fallback Works
User Request
    ↓
Primary Model (primary)
    ↓ (Fail)
Fallback Model 1 (fallbacks[0])
    ↓ (Fail)
Fallback Model 2 (fallbacks[1])
    ↓ (Fail)
...Continue trying
Recommended Fallback Strategies
| Strategy | Config Example | Use Case |
|---|---|---|
| Same-series Downgrade | Opus → Sonnet → Haiku | Maintains consistent style and behavior |
| Cross-platform Backup | Claude → GPT → Gemini | Maximizes availability across providers |
| Cost Optimization | Opus → Local Model | Keeps expenses under control |
| Hybrid Strategy | Cloud → Local → Cloud Backup | A balanced, all-around approach |
Recommended Configuration:
"model": {
  "primary": "apiyi/claude-opus-4-5-20251101",
  "fallbacks": [
    "apiyi/claude-sonnet-4-20250514",
    "apiyi/gpt-4o",
    "qwen-portal/vision-model"
  ]
}
💰 Cost Optimization: By configuring fallbacks through APIYI (apiyi.com), you can automatically switch between multiple models while enjoying a unified billing system, making cost management a breeze.
MoltBot Model Switching: Pro Tips
Quick Switching with Aliases
Once you've set up aliases, you can switch models mid-conversation whenever you like:
You: /model opus
MoltBot: Switched to Claude Opus 4.5

You: /model sonnet
MoltBot: Switched to Claude Sonnet 4

You: /model qwen
MoltBot: Switched to Qwen Coder
Assigning Models to Specific Tasks
You don't have to switch permanently; you can specify a model for a single request:
You: /model gpt help me analyze this image
MoltBot: [Analyzing image using GPT-4o...]

You: /model opus write a deep-dive technical article
MoltBot: [Writing with Claude Opus...]
Checking Current Model Status
# Check via command line
moltbot models list

# Check during a conversation
You: /model
MoltBot: Current model: apiyi/claude-opus-4-5-20251101 (alias: opus)
MoltBot API Proxy Configuration: FAQ
Q1: What should I do if I get an “API Key invalid” error after configuration?
This is usually down to an API Key configuration issue. Check the following:
- Confirm the environment variable is correctly set:
echo $APIYI_API_KEY - Check if the API Key format is correct (usually starts with
sk-) - Ensure the API Key has sufficient balance and permissions
- If you've hardcoded it into the config file, check for extra spaces or line breaks
API Keys obtained via APIYI (apiyi.com) follow the sk-xxx format—make sure you've copied the whole thing.
Q2: How can I use local and cloud models at the same time?
By using the "mode": "merge" configuration, you can use both local and cloud models simultaneously:
{
  "models": {
    "mode": "merge",
    "providers": {
      "local-ollama": {
        "baseUrl": "http://localhost:11434/v1",
        "apiKey": "ollama-local",
        "api": "openai-responses",
        "models": [...]
      },
      "apiyi": {
        "baseUrl": "https://api.apiyi.com/v1",
        "apiKey": "${APIYI_API_KEY}",
        "api": "openai-completions",
        "models": [...]
      }
    }
  }
}
This way, if your local model is unavailable, it can automatically fallback to the cloud service.
Q3: Why isn’t the environment variable ${VAR} working?
MoltBot's environment variable replacement rules are specific:
- It only matches uppercase letters and underscores:
[A-Z_][A-Z0-9_]* - Variable names must be all caps, e.g.,
${APIYI_API_KEY} - Lowercase variable names like
${apiKey}won't be replaced - Unset environment variables will cause configuration loading errors
We recommend using standard naming conventions: APIYI_API_KEY, QWEN_API_KEY, TELEGRAM_BOT_TOKEN.
Q4: How do I use different models for different tasks?
You can achieve this using imageModel and aliases:
"agents": {
  "defaults": {
    "model": {
      "primary": "apiyi/claude-opus-4-5-20251101"
    },
    "imageModel": "apiyi/gpt-4o",
    "models": {
      "apiyi/claude-opus-4-5-20251101": { "alias": "opus" },
      "apiyi/gpt-4o": { "alias": "vision" }
    }
  }
}
- Text tasks will automatically use the primary model (Claude Opus)
- Image tasks will automatically use the
imageModel(GPT-4o) - You can also switch manually using
/model vision
Q5: Which OpenAI-compatible services are supported?
MoltBot supports all services that follow the OpenAI API specification:
| Service Type | Example | Recommendation |
|---|---|---|
| API Proxy | APIYI (apiyi.com) | Recommended (Unified access to multiple models) |
| Official API | OpenAI, Anthropic, Google | Stable official support |
| Local Deployment | Ollama, LM Studio, vLLM | Privacy-first |
| Other Proxies | Groq, Together AI | Choose as needed |
The advantage of APIYI (apiyi.com) is that a single key gives you access to multiple model providers, so you don't have to register for each one separately.
MoltBot API Proxy Configuration: Summary & Recommendations
By now, you should have a solid handle on how to configure API proxies in MoltBot:
- Understand the config structure:
models.providersdefines the services, whileagents.defaultsdefines the usage strategy. - Set up multiple Providers: Connect to several API services at once to improve availability.
- Configure Fallbacks: Automatically switch to a backup model if the primary one fails.
- Use Aliases: Switch models quickly using
/model alias.
Best Practice Recommendations
| Suggestion | Explanation |
|---|---|
| Use environment variables | Never store API Keys in plain text within your config files. |
| Configure Fallbacks | Set up at least 1-2 backup models. |
| Set mode: merge | Keep the default configuration to enhance compatibility. |
| Unify your API entry point | Use APIYI to simplify multi-model management. |
We recommend using APIYI (apiyi.com) as your primary API proxy service. It provides unified access to mainstream Large Language Models like Claude, GPT, and Gemini. The setup is simple, and it supports flexible billing, making it a great fit for MoltBot's multi-model switching capabilities.
References
-
MoltBot Official Docs – Models: Detailed Model Configuration
- Link:
docs.molt.bot/concepts/models - Description: Official model configuration guide
- Link:
-
MoltBot Official Docs – Configuration: Full Configuration Reference
- Link:
docs.molt.bot/gateway/configuration - Description: Detailed breakdown of all configuration options
- Link:
-
MoltBot Official Docs – Model Providers: Provider Configuration
- Link:
docs.molt.bot/concepts/model-providers - Description: How to set up custom providers
- Link:
-
MoltBot GitHub: Source Code and Issue Discussions
- Link:
github.com/moltbot/moltbot - Description: Latest releases and community feedback
- Link:
Author: APIYI Team | For more AI tech insights, visit APIYI at apiyi.com
Updated: January 2026