

Author’s note: Put the Apidog scenario run command into CLAUDE.md so Claude Code can run API automation tests against an existing scenario, determine the result by exit code, and design billing- and moderation-related assertions using the Seedance video API as an example.
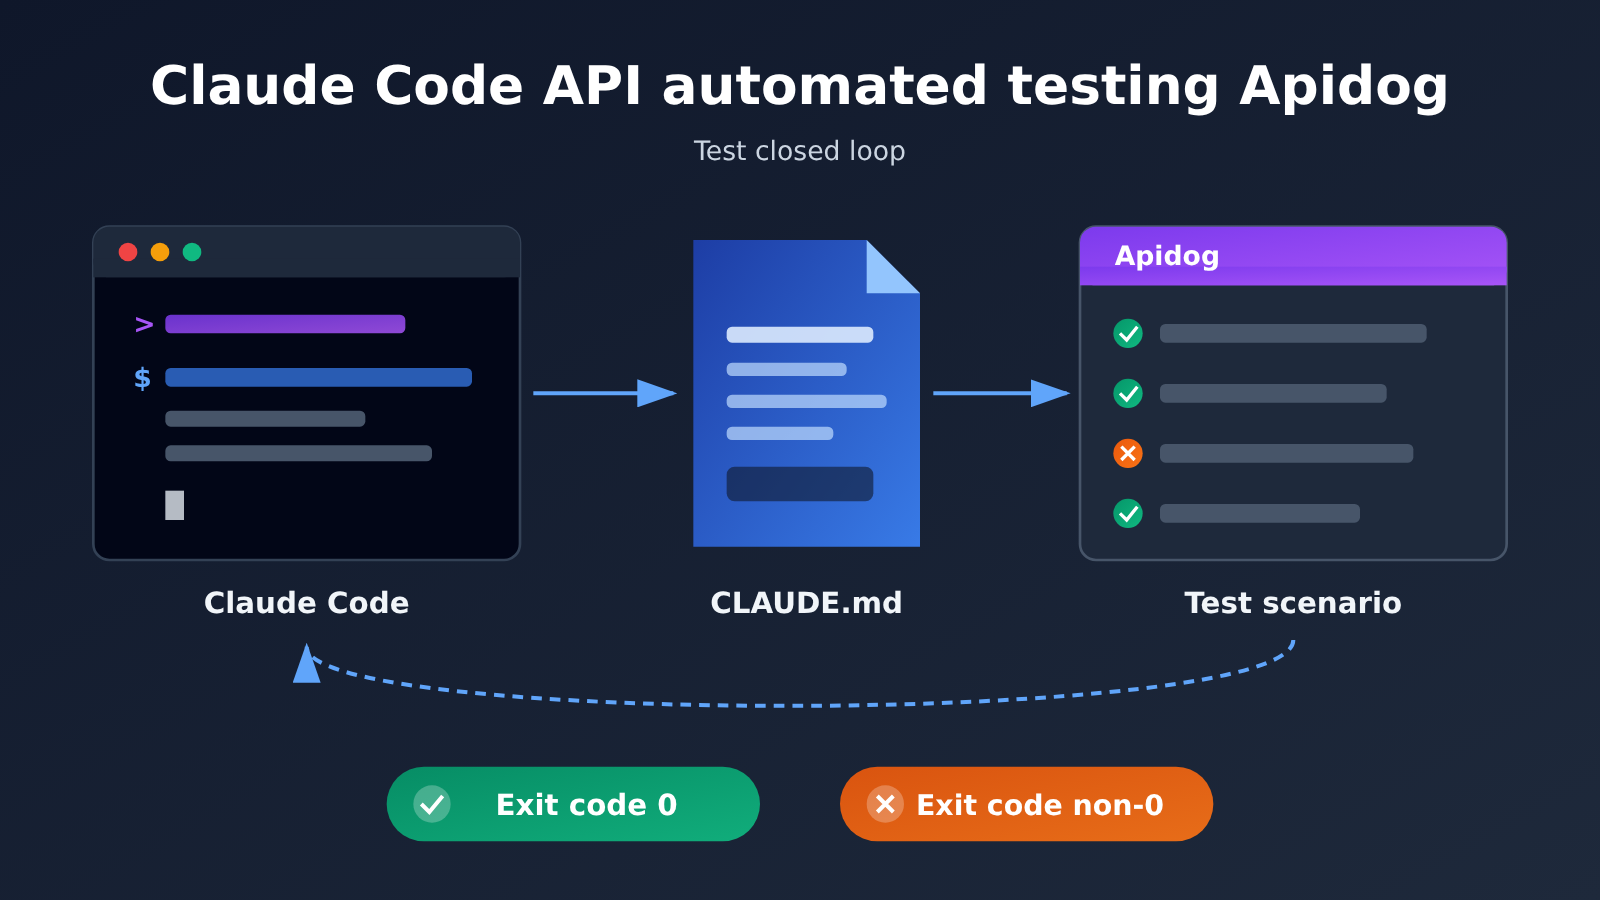
If you’re already using Claude Code to write API code, you’ve probably run into this: after changing a single field, you still have to switch to Apidog, manually run the scenario once, then come back and tell Claude Code the result. This article’s approach is to put the Apidog CLI scenario run command into CLAUDE.md so Claude Code can run the tests itself and read the exit code itself, turning Claude Code API automation testing into a closed loop.
This isn’t another Claude Code beginner’s guide. The Apidog steps in this article come from an official vendor tutorial published by Apidog, and Seedance’s billing and moderation rules come from the original APIYI documentation. Both are clearly attributed in the article so you can check them yourself.
What you’ll get: By the end, you’ll know how to pin the run command in CLAUDE.md, why pass/fail should be based on the exit code rather than the model’s verbal conclusion, where the token should live, and which assertions are actually worth writing for an asynchronous video API.
Claude Code API Automation Testing: Apidog Key Points
Before you start, break the whole approach down into a few key decisions. The table below pulls together the constraints from the vendor tutorial and the APIYI docs that matter for this setup — each one directly affects whether the tests can be reproduced reliably.
| Point | Description | Value |
|---|---|---|
| Put the run command in CLAUDE.md | Claude Code reads CLAUDE.md at the repo root; the command shape is apidog run -t <scenario ID> -e <environment ID> -r cli |
Every session runs the same command instead of relying on memory |
| Decide results by exit code | Exit code 0 means all assertions passed; non-zero means something failed | Stops the model from saying “it passed” when it actually didn’t |
| Copy IDs from the CI/CD page | Get the scenario ID and environment ID from that scenario’s CI/CD page in Apidog | Keeps the model from inventing IDs and hitting “scenario not found” |
| Keep tokens out of files | Log in locally with apidog login; don’t write --access-token into CLAUDE.md |
Prevents the token from leaking through a repo commit |
| Separate the two endpoint types | The text model driving Claude Code and the video API under test are not the same endpoint | Cleaner config, traceable billing |
How Claude Code Reads CLAUDE.md
According to the Apidog vendor tutorial, the tool itself is the npm package apidog-cli, and when Claude Code starts up it reads CLAUDE.md at the repo root as the project description. In other words, the run command, pass/fail rules, and prohibitions you write in this file become context for every Claude Code session. If you’re not sure which instruction files were loaded for a particular session, run /memory inside Claude Code to check.
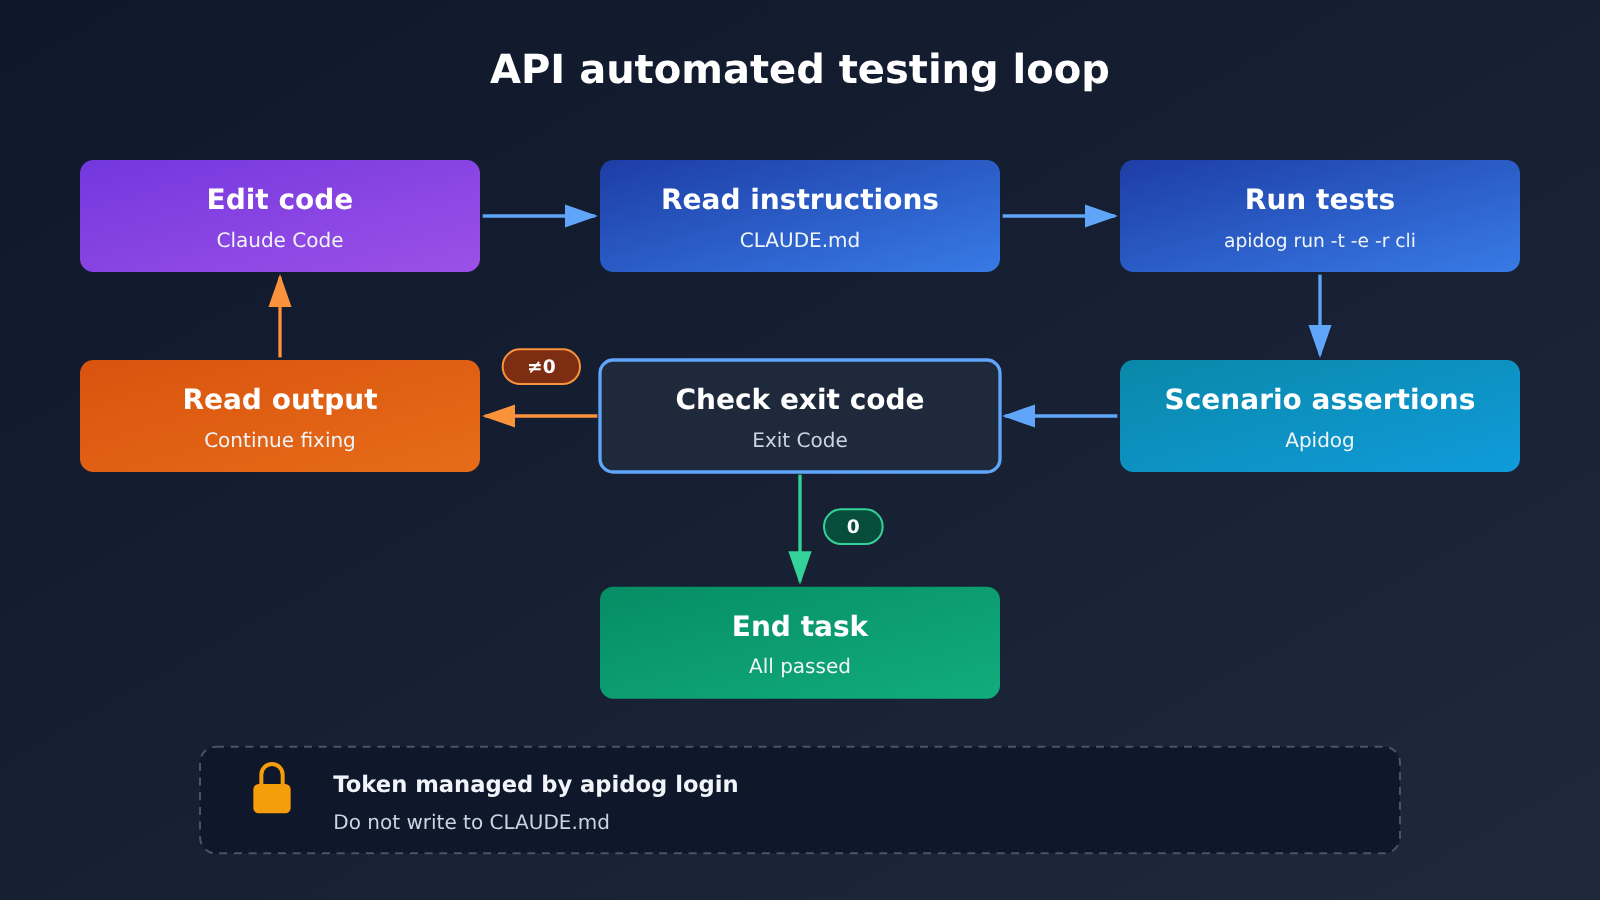
This is what makes the setup stable. Rather than repeating “please run the Apidog scenario for me” in every conversation, you bake the command in once. After Claude Code finishes editing code, it calls apidog run based on what CLAUDE.md says, and uses the terminal output to decide whether to keep fixing things or call it done.
Apidog CLI Exit Codes and Report Formats in Detail
The vendor tutorial stresses that the -r cli report format has to stay, because Claude Code relies on terminal output to decide its next move. If you also want a report you can open in a browser, append html to the -r argument; the generated file lands in ./apidog-reports. Note that this is “append,” not “replace” — dropping the cli report takes away Claude Code’s basis for reading results.
The exit code is the referee for the whole setup. The checking order from the tutorial is worth copying: first confirm apidog run actually shows up in the terminal; then look at the exit code — when the code disagrees with the model’s verbal conclusion, trust the exit code; if you see “scenario not found,” go back to CLAUDE.md and check whether the ID is correct.
Claude Code API Automation Testing: Quick Start
This section walks through the order: “prepare the environment → write CLAUDE.md → configure permissions → run the first test.” Since this is an online tutorial format, all commands are given as inline code, and you can copy each one into your terminal to run it.
Step 1: Configure Claude Code’s model connection address
Running Claude Code itself consumes tokens, and calling the video interface under test later costs another chunk on top of that — so let’s first get the two kinds of connection addresses straight. When you connect through APIYI, Claude Code uses the Anthropic native protocol, and the address is https://api.apiyi.com. Don’t add /v1 after it, or it’ll end up as /v1/v1/messages and the request will fail. Only clients using the OpenAI-compatible protocol should point at https://api.apiyi.com/v1.
In practice, you set environment variables in the shell that launches Claude Code: ANTHROPIC_BASE_URL to the Anthropic native address, and ANTHROPIC_AUTH_TOKEN to the token you created on the platform. For Claude series models, it’s best to put the token in the ClaudeCode group, managed separately from the token used by the video interface later.
🚀 Quick Start: The officially recommended approach is to create separate tokens in the APIYI apiyi.com console — one for Claude Code and one for the interface under test. New users get free trial credits, which is enough to get your first scenario running before deciding which model to use long term.
Step 2: Write test instructions in CLAUDE.md
According to the vendor tutorial, the test-related content in CLAUDE.md should include the following items, each written clearly in one sentence:
- Run command: For regression tests, use
apidog run -t <scenario ID> -e <environment ID> -r cli, where the two IDs are the actual values copied from the Apidog CI/CD page. - Pass/fail rule: Judge the result by the command’s exit code: 0 means all passed, and non-zero means there were failures. Don’t use a natural-language summary as the conclusion.
- Prohibitions: Don’t make up or modify scenario IDs or environment IDs on your own; don’t add
--access-tokento the command. - Report requirements: Keep
-r cli. If you need a browser report, you can appendhtml. Artifacts are located in./apidog-reports. - Region notes: If the project is deployed in Apidog’s Europe region, the command needs an additional
--api-base-url api.eu.apidog.com. This is Apidog’s own regional endpoint and has nothing to do with the model access endpoint.
Step 3: Login and permission configuration
Token management is the part most likely to go wrong. The vendor tutorial recommends running apidog login once locally to complete login. It explicitly says not to write the token into CLAUDE.md, and not to let --access-token appear in this file. CLAUDE.md is usually committed along with the repository, so once a token is written into it, it’s effectively public.
By default, Claude Code asks before executing Bash commands. If you want it to run tests automatically, you can add Bash(apidog run *) to the permission allow list in .claude/settings.json, allowing only this type of command. The tutorial also reminds you that --dangerously-skip-permissions is only suitable for one-off environments like CI, not for a local machine that’s always on every day.
| Configuration item | Recommended practice | Not recommended | Source |
|---|---|---|---|
| Apidog login | Run apidog login locally |
Write --access-token in CLAUDE.md |
Vendor tutorial |
| Command allowlisting | allow Bash(apidog run *) |
Leave --dangerously-skip-permissions enabled locally all the time |
Vendor tutorial |
| Scenario ID | Copy from the CI/CD page | Let the model infer or generate it | Vendor tutorial |
| Claude Code endpoint | ANTHROPIC_BASE_URL without /v1 |
Including /v1 causes duplicate paths |
APIYI documentation |
| Token group | Use ClaudeCode for Claude, SeeDance2 for video |
Use one token across all groups | APIYI documentation |
Step 4: Get the First Run Working and Verify It
Once the configuration is done, have Claude Code run a regression test. Following the verification order in the vendor’s tutorial, you need to confirm three things with your own eyes: the terminal shows the complete apidog run command; the command returns an explicit exit code; and if anything fails, the terminal output shows exactly which assertion failed. Only when all three are satisfied is this loop truly established.
💡 Technical tip: On your first successful run, try deliberately setting one assertion’s expected value to something wrong, then confirm the exit code becomes non-zero and Claude Code uses that to keep digging. This step verifies that the “exit code is the source of truth” rule is actually in effect.
Claude Code API Automation Testing in Practice: Assertion Design for the Seedance Video API
Testing text APIs is fairly intuitive; asynchronous video APIs are where assertion design really gets put to the test. This section uses the Seedance series already available on APIYI as an example to explain what you should and shouldn’t assert in an Apidog scenario.
Seedance Models, Groups, and Pricing
According to the APIYI documentation, the available Seedance model IDs are doubao-seedance-2-5-260628, doubao-seedance-2-0-260128, doubao-seedance-2-0-fast-260128, and doubao-seedance-2-0-mini-260615. Tokens used to call these models must belong to the SeeDance2 group; otherwise, the request returns “the model has no available channels.” The video API under test and the text model that drives Claude Code are two different endpoints. You can’t make them interchangeable just by changing the model field; in Apidog scenarios, you need to configure the submission and query requests separately according to the Seedance documentation.
The table below shows the pay-as-you-go list prices from the master pricing table (updated 2026-11-16), in USD per 1 million tokens. Model IDs and prices are subject to the platform’s model list.
| Model | Input | Output | Cache read | Available platform |
|---|---|---|---|---|
doubao-seedance-2-5-260628 |
70 | 70 | None | APIYI apiyi.com |
doubao-seedance-2-0-260128 |
46 | 46 | None | APIYI |
doubao-seedance-2-0-fast-260128 |
37 | 37 | None | APIYI |
doubao-seedance-2-0-mini-260615 |
23 | 23 | None | APIYI |
The documentation also gives a conversion example for a 720p, 5-second video: about $1.3721 for 2.5 and about $0.9074 for 2.0 standard. Note that this is just an example of converting the per-million-token unit price into a per-video price; it’s not a separate pricing scheme from the master table.
Five Recommended Assertions
All five assertions below are drawn straight from the source documentation and can drop right into an Apidog scenario:
- The task has an ID: once the submit request succeeds, the response must include a task ID. Every later poll depends on it, so a missing ID means failure.
- Pass the duration explicitly: the docs state that for 2.5 the
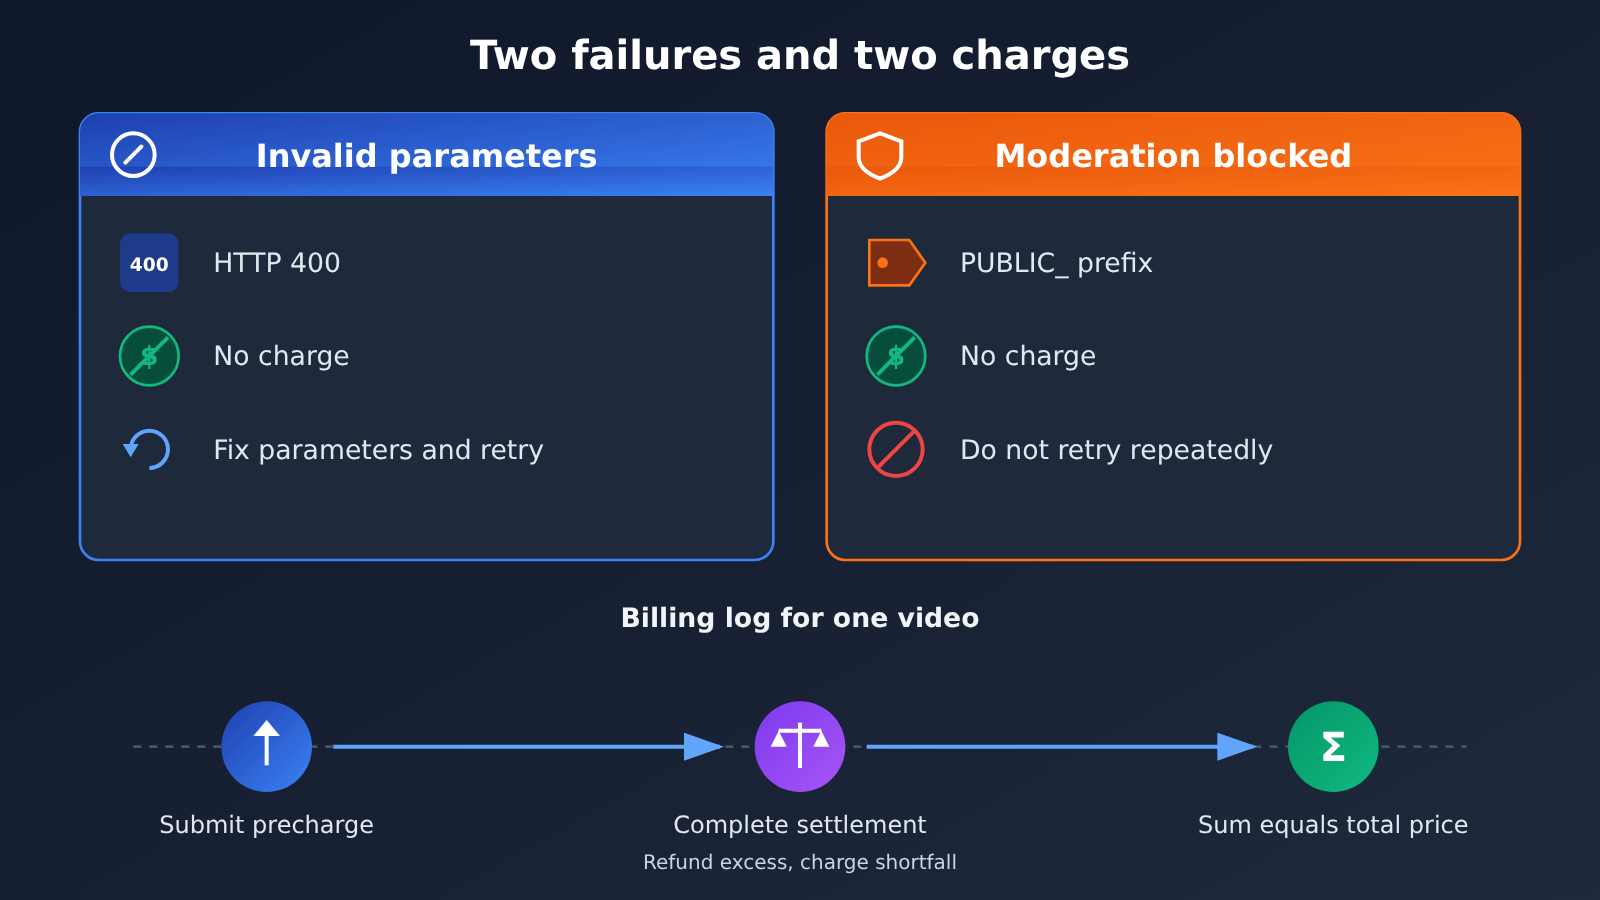
durationdefault is -1, so test requests should pass the duration explicitly — otherwise costs across different runs can’t be compared. - Parameter errors aren’t billed: the docs state that HTTP 400 parameter errors aren’t charged. You can build a request that omits a required field, assert the status code is 400, and confirm in the logs that nothing was deducted.
- Moderation blocks aren’t billed: errors prefixed with
PUBLIC_are content moderation blocks from the upstream provider, and those aren’t billed either. The assertion only needs to recognize this error code and treat it as a different kind of failure from a parameter error. - The total price is the sum of two log entries: the docs state that a single video produces two billing entries in the logs — a pre-charge at submit time, then a settle-up after completion (refund if over, charge if short). Total spend is the sum of both.
As for the pre-charge amount, the docs quote roughly $0.09/second for the 2.0 family and about $0.135/second for 2.5, settled against actual tokens on completion. So your cost assertion can’t look at just the first log entry — that’s only the pre-charge.
What Shouldn’t Be Written as Tests
Moderation blocking is a compliance boundary, not a test case you’re supposed to “break through.” The docs explicitly advise against retrying with the same prompt over and over after a moderation failure, so your scenarios shouldn’t include loop retries or steps that probe the moderation rules either. Likewise, reference images containing real human faces get rejected upstream — you need to store them first and then reference them via asset://. That’s a compliance prerequisite, and it belongs in your test data preparation notes, not in a test case.
📊 Data note: The Seedance billing and moderation rules above are taken from the original APIYI documentation. Check the latest description on the Seedance page in the apiyi.com documentation center before locking them into assertions.
Choosing a Driver Model for Claude Code and the Cost
Running tests with Claude Code burns tokens too, so which model you pick directly affects your day-to-day costs. The table below shows the list prices for three Claude models from the overall price table — again in USD per 1 million tokens — all supporting the chat and messages endpoints.
| Model | Input | Output | Cache read | Group |
|---|---|---|---|---|
claude-opus-5-5 |
4 | 20 | 0.2 | ClaudeCode, Claude_Reverse, Claude_Enterprise, Default, SVIP |
claude-sonnet-5-5 |
2 | 10 | 0.1 | Same as above |
claude-haiku-5-5 |
0.1 for 0–100K tokens, 0.5 above | 0.5 | 0.01 | ClaudeCode, Claude_Enterprise, Default, SVIP |
Note that the Haiku row has no Claude_Reverse group. If your token only belongs to that group, switching to Haiku leaves you with no available channel. A common approach: use a lighter model for day-to-day structured tasks like running regressions and reading exit codes in Claude Code, then switch to a stronger model when you hit complex failures that need deeper investigation.
💰 Cost optimization: Since both the driver model and the interface under test are being billed, it’s worth checking your usage logs by token in the APIYI console — track Claude Code consumption and Seedance consumption separately to figure out which side the test costs are mainly going to.
Common Questions (FAQ)
Q1: What exactly is the Apidog approach to Claude Code API automation testing?
Put simply, you write Apidog CLI’s scenario run command into the `CLAUDE.md` file at the repo root, so Claude Code runs `apidog run` itself after finishing a code change and decides whether the tests passed based on the exit code — no more clicking Run by hand.
Q2: Why trust the exit code instead of Claude Code’s conclusion?
The model’s natural-language summary can drift from reality, while the exit code is a deterministic result handed back by the test tool itself. The vendor’s tutorial states this plainly: when the two disagree, the exit code wins — 0 means everything passed, anything non-zero means something failed.
Q3: Should I add /v1 to the Claude Code endpoint?
No. Claude Code speaks Anthropic’s native protocol, so the endpoint is `https://api.apiyi.com`; appending `/v1` gives you `/v1/v1/messages`. Only OpenAI-compatible clients use the address with `/v1`.
Q4: Where should the Apidog token go?
Just run `apidog login` on your machine. The vendor’s tutorial explicitly says not to put `–access-token` in `CLAUDE.md`, and not to write the token into that file at all, so it doesn’t leak along with the code repository.
Q5: How do I get started calling Seedance for video API testing?
Sign up at APIYI apiyi.com, create a token in the `SeeDance2` group, configure the submit and query requests according to the Seedance docs, and add assertions to the Apidog scenario covering the task ID, explicit duration, error-code classification, and the two billing log entries. New users’ free testing credits are enough to get the first scenario running end to end.
Q6: What should I do if Claude Code says the scenario can’t be found?
First confirm which command is actually running in the terminal, then go back to `CLAUDE.md` and check the scenario ID and environment ID — always re-copy them from that scenario’s CI/CD page in Apidog rather than letting the model guess. For EU-region projects, also check whether `–api-base-url api.eu.apidog.com` was added.
Q7: What are the limitations of this approach?
Three of them. First, double billing: Claude Code and the API under test each consume tokens. Second, permissions should be granted sparingly — locally, allow only `Bash(apidog run *)`. Third, review interception and real-face reference images sit on a compliance boundary, so you can only detect and handle them upfront; never design test cases that are meant to bypass them.
Claude Code API Automation Testing: Key Takeaways
- Lock in the command: Put
apidog run -t -e -r cliinto CLAUDE.md, and run the same command every session. - Exit code is the judge: 0 means pass, non-zero means fail. If it conflicts with a verbal conclusion, the exit code wins.
- Token isolation: Log in locally with
apidog login; neither the token nor--access-tokengoes into CLAUDE.md. - Least privilege: Allow only
Bash(apidog run *); the permission-skipping option is for CI only. - Know your endpoints: Claude Code uses the native endpoint without
/v1; only OpenAI-compatible endpoints include/v1. - Video assertions: task ID, explicit duration, 400 and
PUBLIC_classification, and the combined total price from the two logs. - How to get started: Create separate
ClaudeCodeandSeeDance2group tokens in APIYI, and use the free quota to get the first scenario running end to end.
Summary
The key to Claude Code API automation testing with Apidog comes down to three things:
- Put commands and rules in files: CLAUDE.md holds the run command, the pass/fail rules, and the prohibited actions, while tokens are handled by
apidog login. - Let the exit code have the final say: Keep the
-r clioutput, and verify the command, exit code, and ID in the order shown in the vendor’s tutorial. - Make assertions match real billing: For asynchronous video APIs, assert task status, distinguish parameter errors from moderation blocks, add up the two billing log entries, and pass the duration explicitly.
We recommend starting with the simplest text API scenario to get the full loop working, then gradually adding assertions for asynchronous APIs like Seedance. We recommend using APIYI (apiyi.com) to manage the tokens and usage for Claude Code and the model under test with the same account, so you can see costs on both sides at a glance and keep optimizing your testing spend.
📚 References
- Apidog Vendor Tutorial: Using Apidog CLI in Claude Code: authored by INEZA Felin-Michel; the version date is as shown on the site
- Link:
apidog.com/blog/apidog-cli-in-claude-code -
Notes: the source for the CLAUDE.md approach, exit-code rules, permission configuration, and the verification order
-
Apidog CLI Official Overview: how the CLI is positioned for agents and CI, plus its regional parameters
- Link:
docs.apidog.com/en/introduction-to-apidog-cli-605134m0 -
Notes: covers the Europe-region
--api-base-urlexplanation -
APIYI Seedance 2 Docs: model IDs, groups, billing, and moderation rules
- Link:
docs.apiyi.com/api-capabilities/seedance2/overview -
Notes: the basis for the video assertion design in this article
-
APIYI Master Model Price List: usage-based pricing and groups for each model
- Link:
docs.apiyi.com/models -
Notes: model names and prices follow the latest content on this page
-
APIYI Protocol Notes: the difference between Anthropic-native and OpenAI-compatible endpoints
- Link:
docs.apiyi.com/llms.txt - Notes: explains why the Claude Code endpoint must not include
/v1
Author: APIYI Technical Team
Technical Exchange: Reach out to us through the homepage of the APIYI website; for more resources, visit the documentation center at docs.apiyi.com


